A Calculated Insight is an information that you create out of your data in Data Cloud for each Unified Individual. You can then embed it in a Data Graph to personalise your Emails, use it as Flow decision criteria, Segment your audience or display it on your Leads and Contacts.
Review the Data Cloud survival guide.
Calculated Insights Types
To use a Calculated Insight with Marketing Cloud Growth/Advanced edition, you first create it in Data Cloud, and there are several options. A visual Builder is provided and available for some Calculated Insight types (the Step by Step guide below is using it).
You can create Calculated Insights from a Package that you install, or from a Data Kit in your Org (1&2). In those cases, you just install a predefined Calculated Insight.
A Calculated Insight can also be Real-Time (3). As all Real Time features in Data Cloud (Identity Resolution, Segments) it relies on Real Time Data Graph, and the Sub-Second Real Time option must be activated in Data Cloud. Visual Builder is used for this type of Calculated Insight.
The Streaming Insights (4) are based on Streaming Data Streams, like Web SDK which ingestion is real time.
And finally, the Batch Calculated Insights which can be scheduled (every 1h, 6h, 12h or 24h). Those come in two flavours, you can create them with an SQL Query (5) or with the Visual Builder (6). We’ll go for the last option here (note, even if built in a visual environnement also, you can access the generated SQL Query).

Customer Life Time Value (CLTV)
In this article, we will build, step by step a Customer Life Time Value Calculated Insight as an example.
Simply put, the CLTV is a metric that aggregates the total revenue (or profit) expected from a customer over time.
There are different ways of computing it, in this Step by Step guide, we will build a CLTV that is the sum of all Closed Won Opportunities.
A Calculated Insight is related to the Unified Individual DMO, so once it is published and scheduled, it is basically a table with two columns, the first one contains the Unified Individual Id, and the second the CLTV.
Before we jump to the Visual Builder, we must answer the Following question: how do we relate Opportunities to Unified Individuals? After all Opportunities are related to Accounts and a Unified Individual is created by the Identity Resolution, as a set of matched Individuals (Leads, Contacts, etc.).
Data Model Exploration
In Data Cloud, we have DMOs, to which, ingested data is mapped, and those standardised objects are related to each other.
Mostly, Data Cloud’s Data Model mirrors the Salesforce’s Platform Data Model (SFDC).
In Salesforce, the Opportunity Standard Object is mainly related to the Account Standard Object. An Account may have several Opportunities. Opportunities are also related to Contacts, using a Junction Object, called Opportunity Contact Role. This is heavily used in the context of Influence and Attribution, and we won’t use it there.
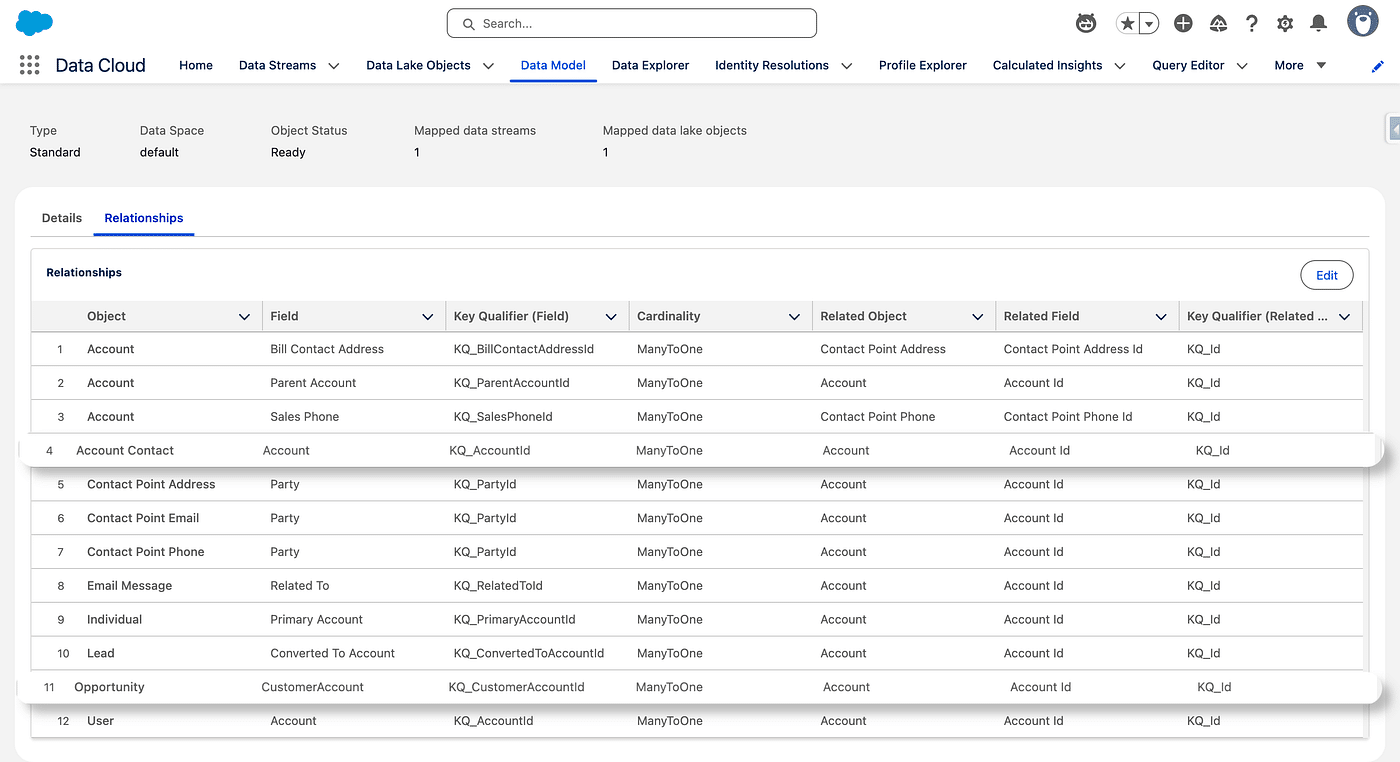
So let’s start with Account DMO and see its relationships.
Map new fields to the Unified Individual (step-by-step)
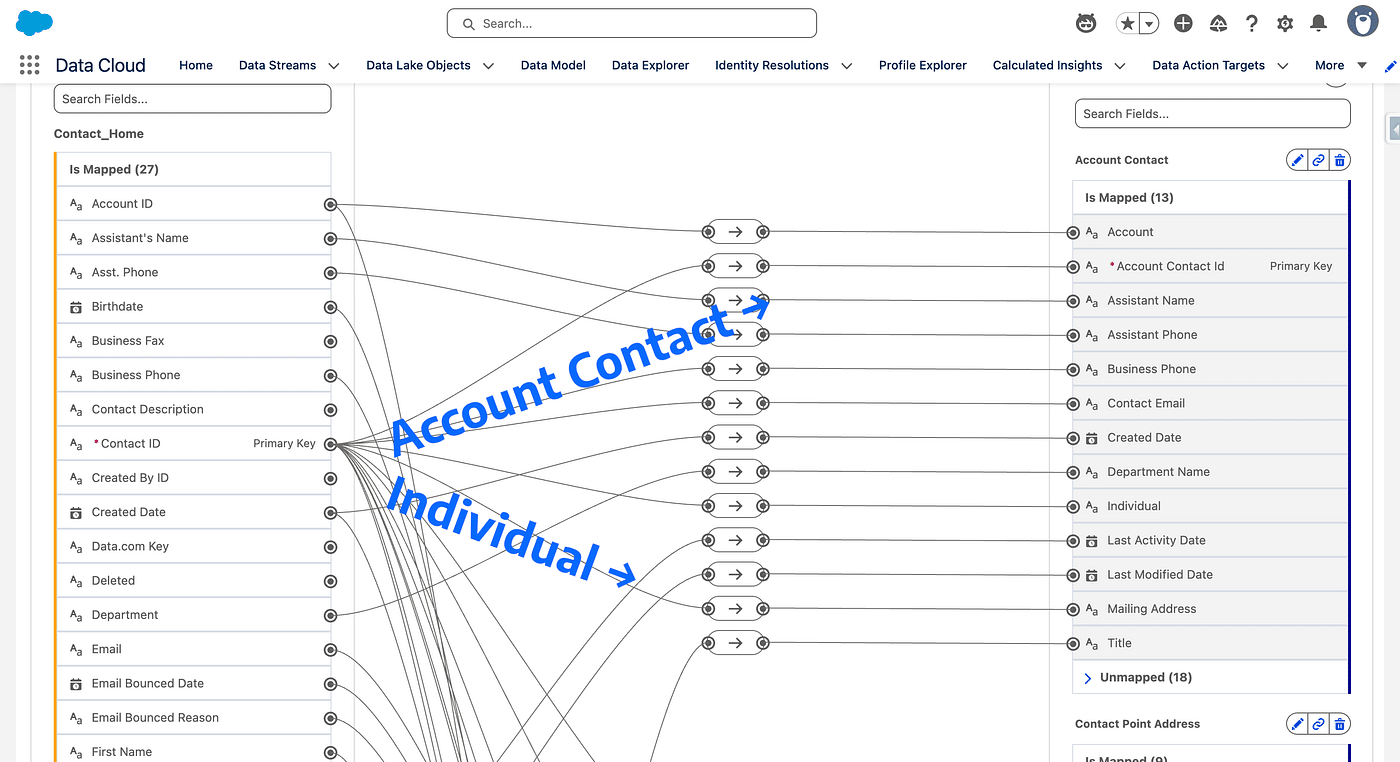
The Account Contact DMO is mapped to the Contact_Home DSO/DLO which is also mapped to the Individual DMO. Both mapping use the Salesforce Contact Id (003…) as a primary key.
So, from the Account DMO, we can get the list of all Opportunities a given account is related to, aswell as the list of all Contacts that given account is related. From there, the List of all Individuals corresponding to the Contacts, and finally, the Unified Individual assocatied with these Individuals.
Sounds like a plan 😎. Before you compute CLTV, handle sub-addressing to keep identities clean
Step by Step guide to build our CLTV Calculated Insight
- Create the Calculated Insight: Data Cloud > Calculated Insight > New > Create with Visual Builder
- Choose a Calculated type Insight
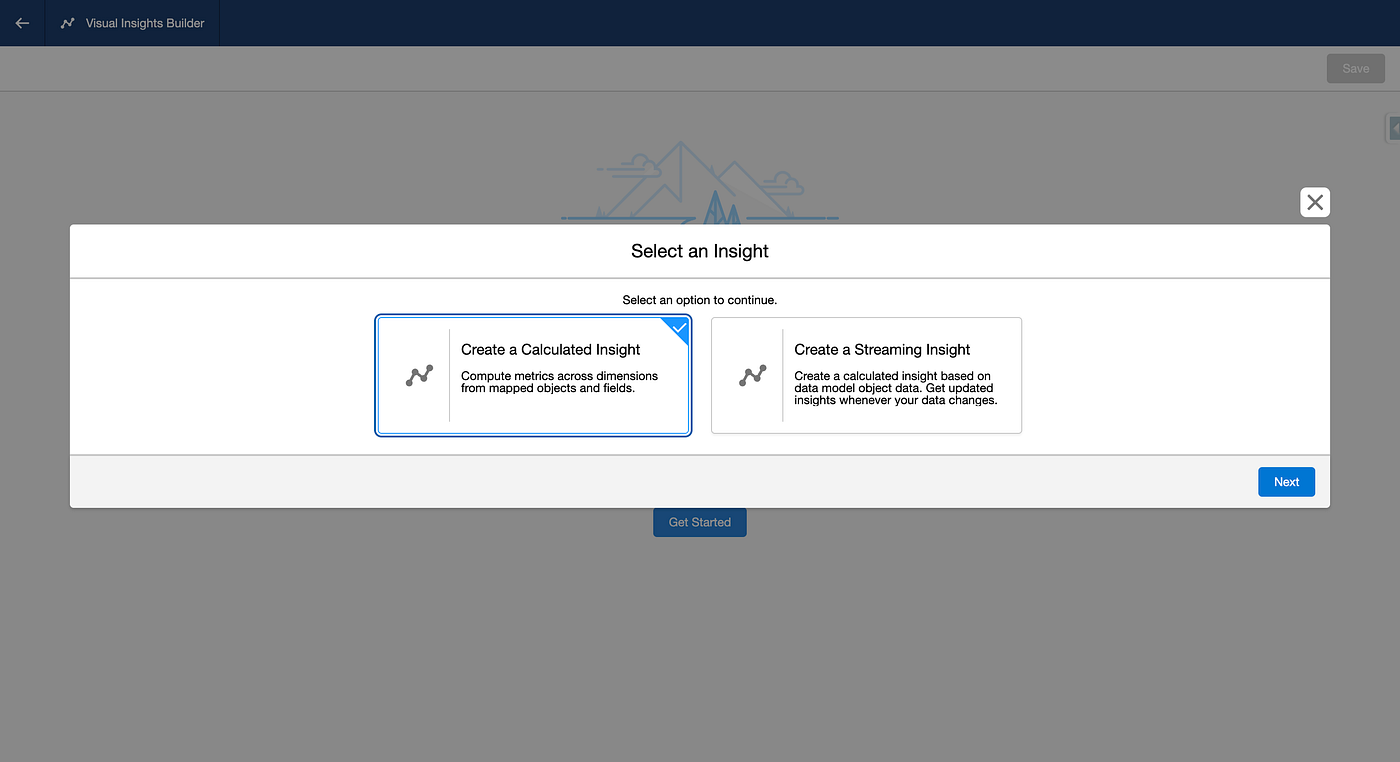
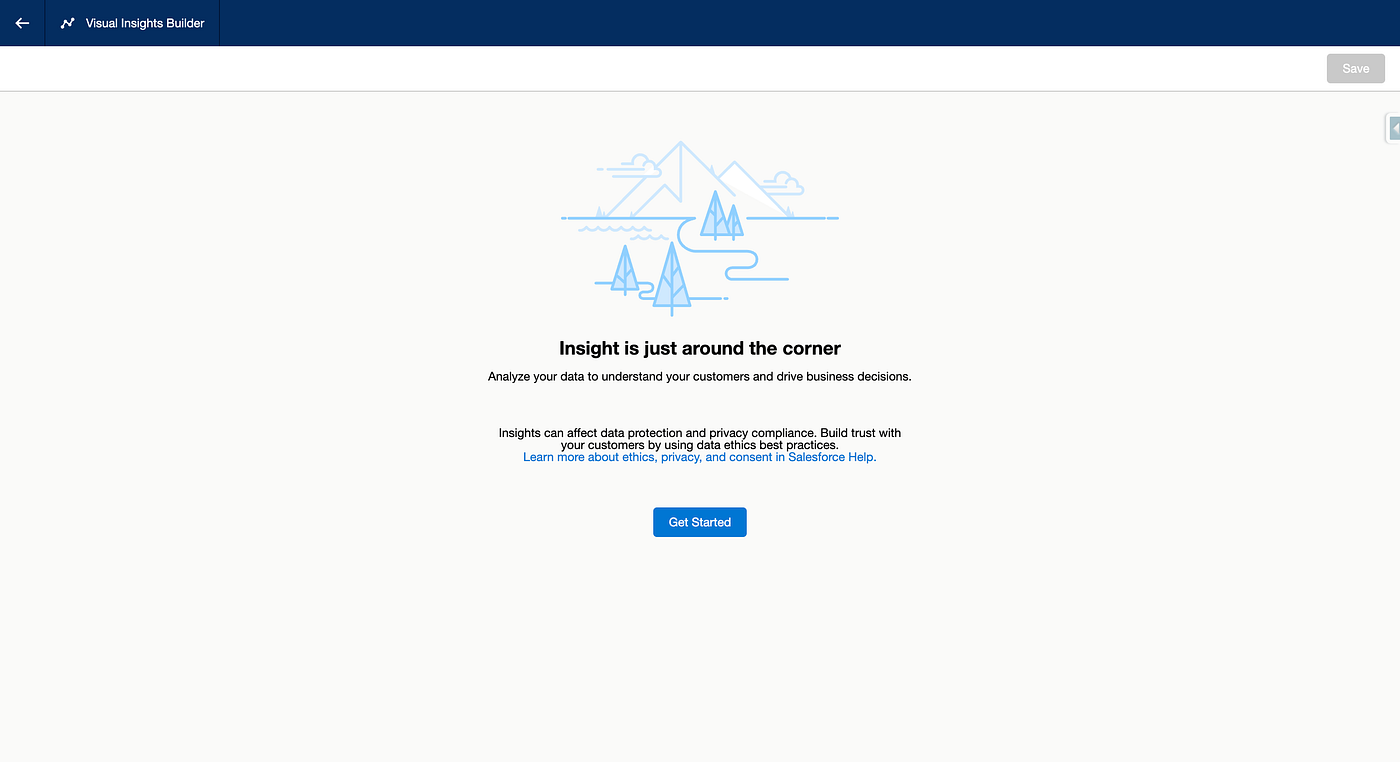
3. Click Get Started
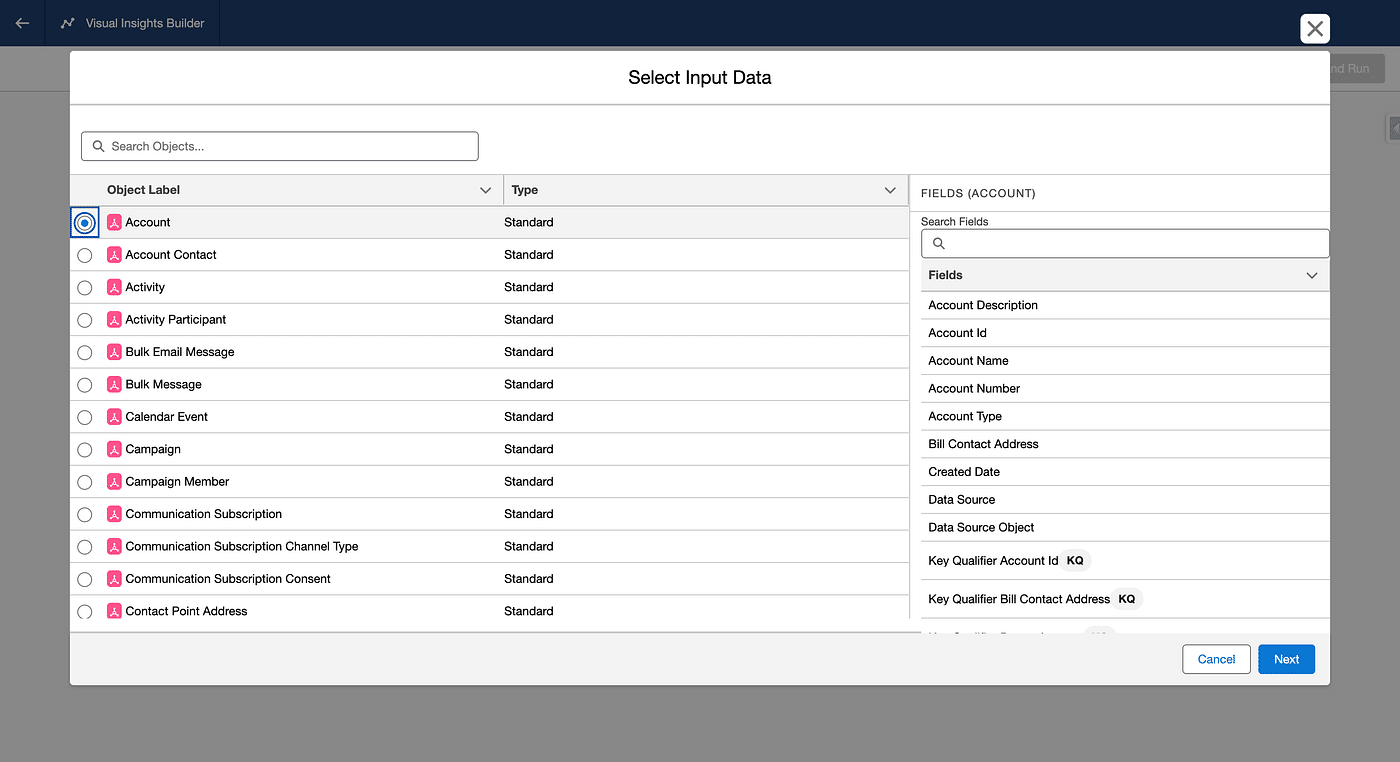
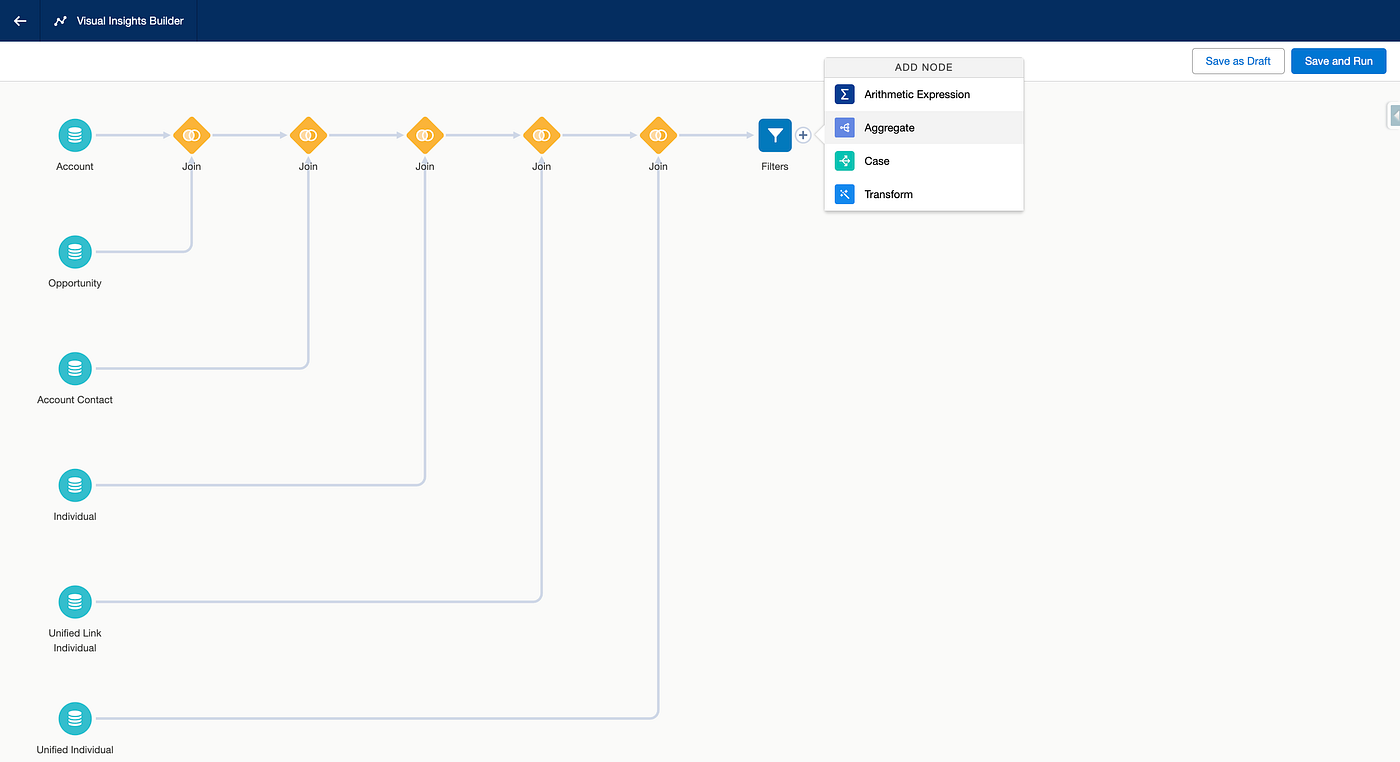
4. Select the Account DMO as a First data source
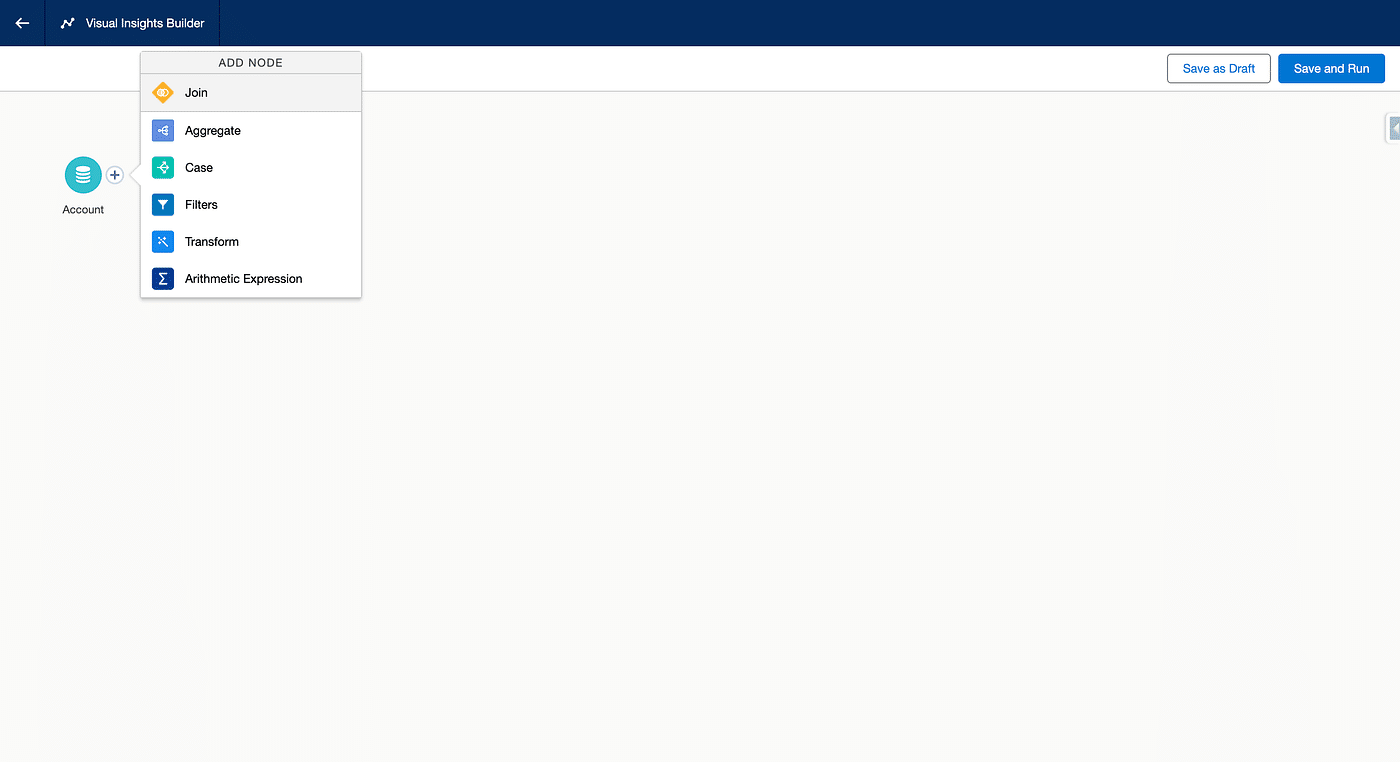
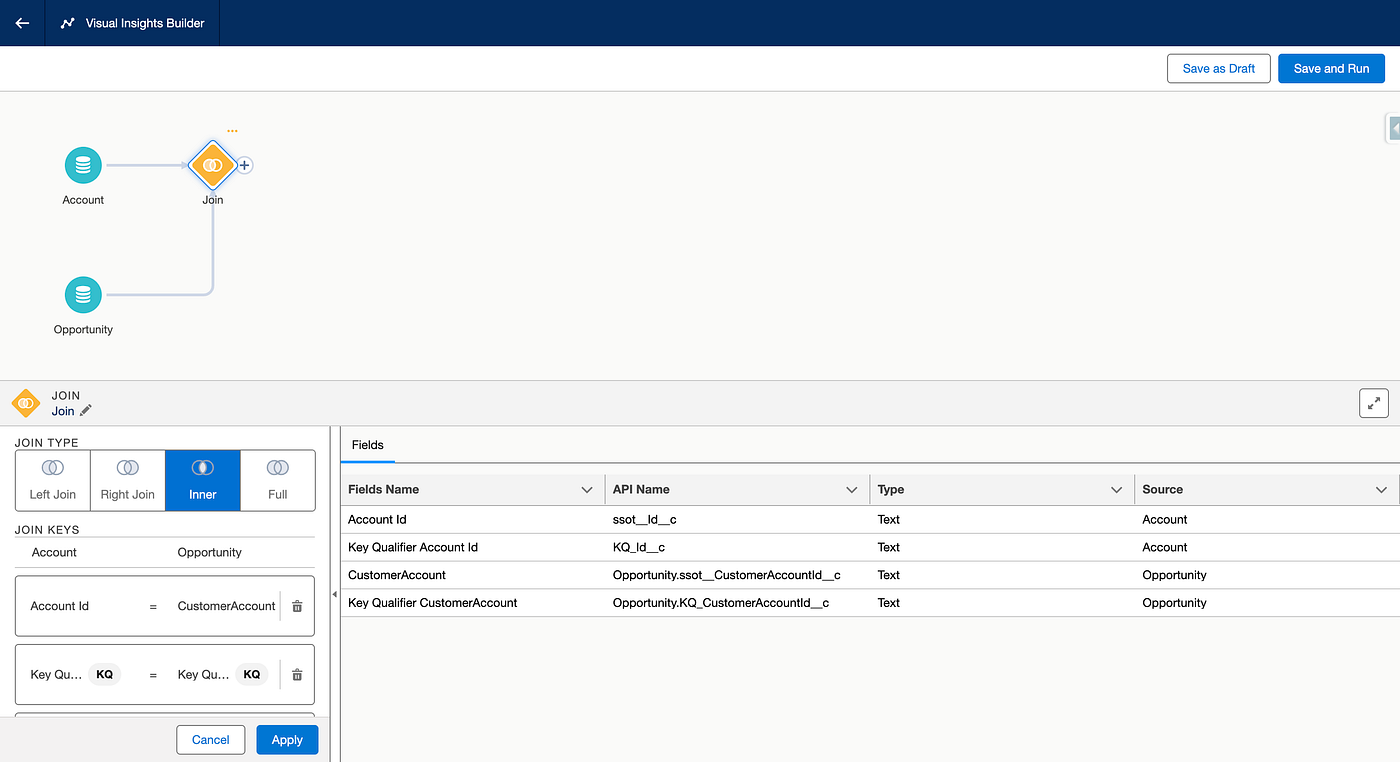
5. Then click the Plus sign to add the Opportunity DMO, using a “Join” action.
6. Stick with the default options. Here we could adjust the Join type (Inner, Right, Left, etc.) and what fields are common on both DMO and must have an identical value to match. This fields are already selected, with their correct values here. Click Apply and then anywhere in the upper canvas to close the bottom window.
7. At this stage we have a table containing one line per Opportunity with all the infos from the associated Account. We said the Account DMO is also linked to the Account Contacts, so let’s add it by selecting the Plus sign on the Join element and selecting the Join action, then the Account Contact DMO.
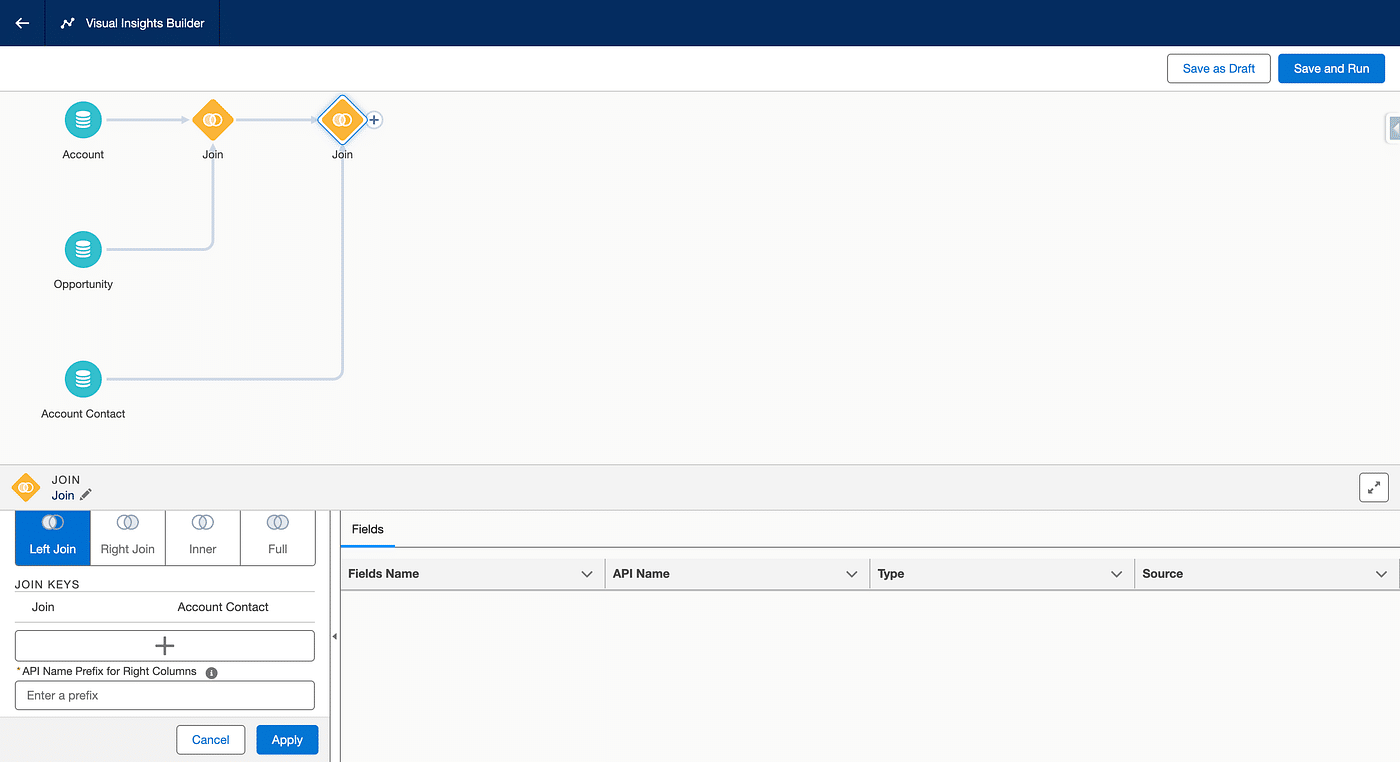
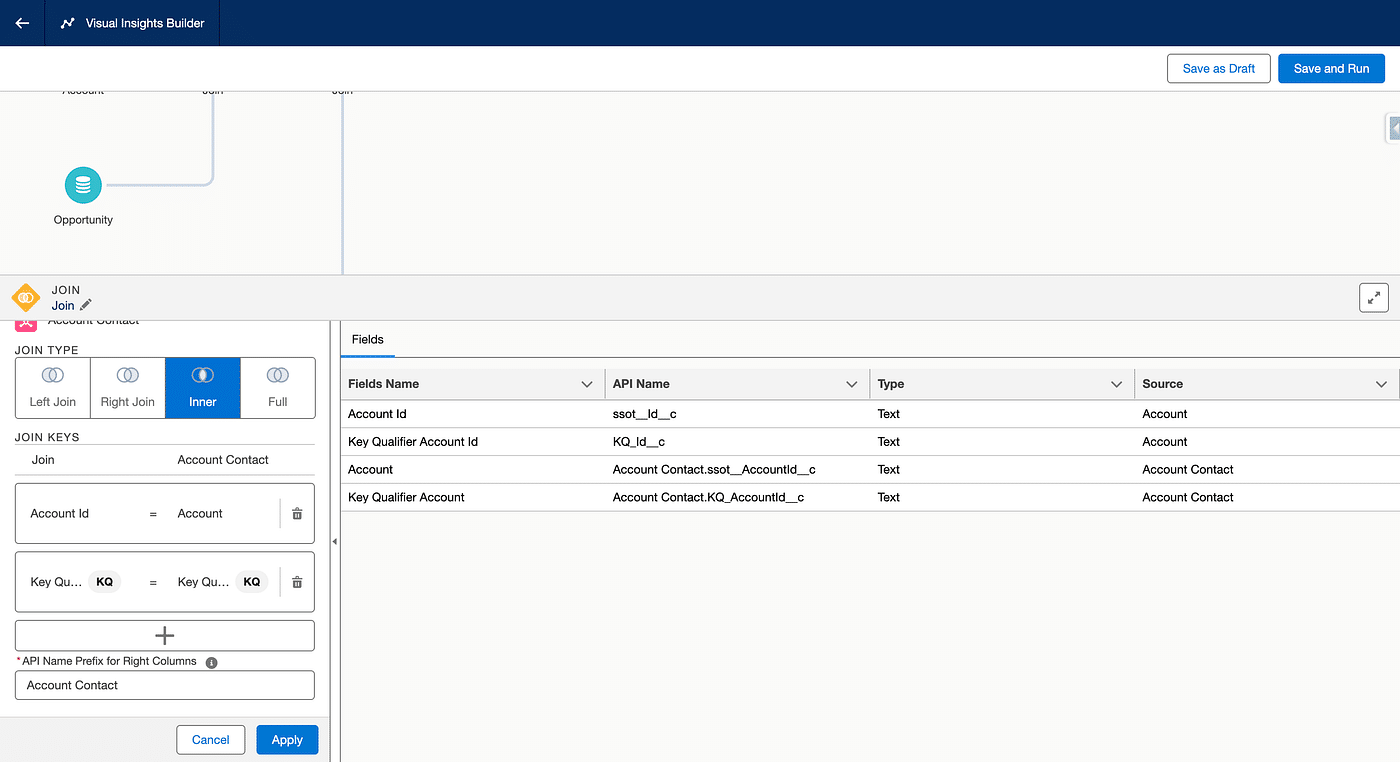
8. Here the Join type and the matching fields are not predefined, this is due the fact that multiple choices are possible. For the Join Type, we will select Inner and then select the + sign under Join Keys. On the Join Column, we will select Account Id
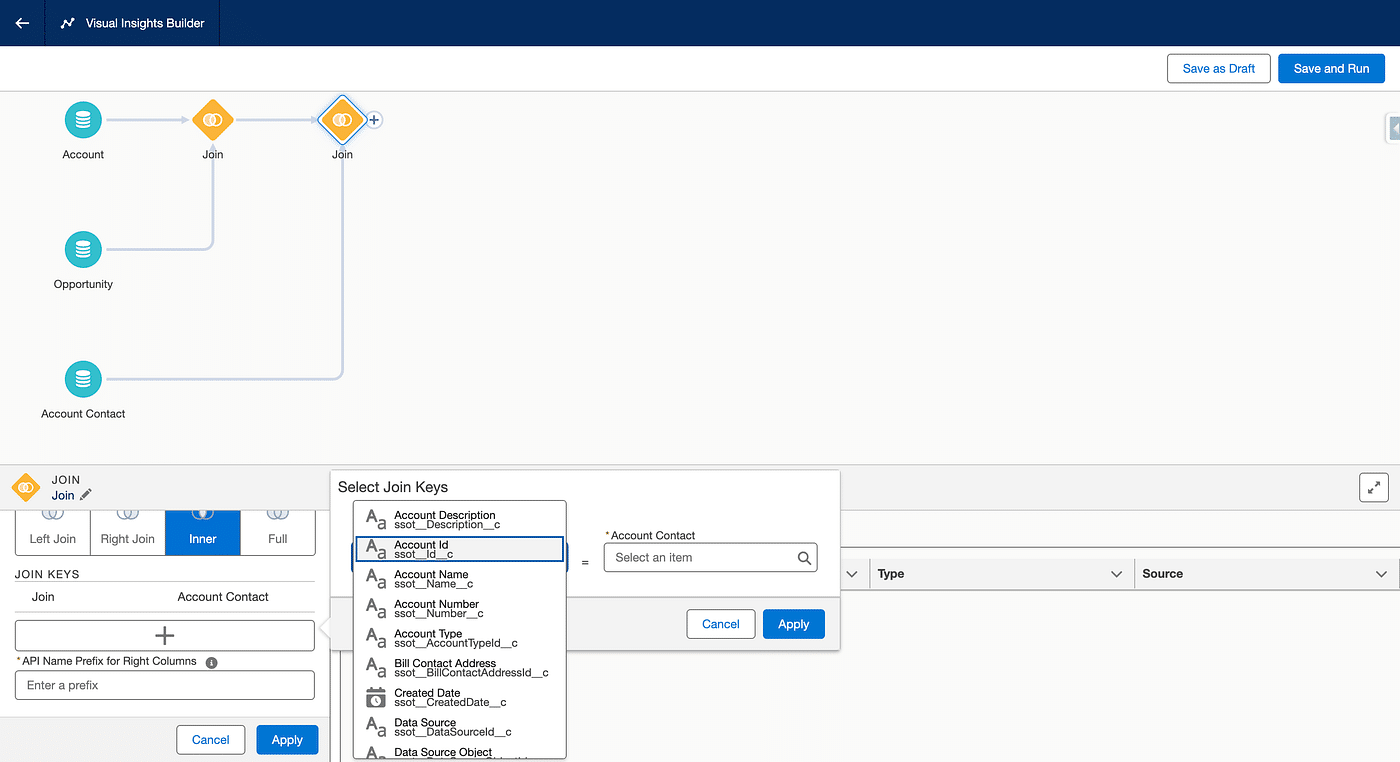
9. Then in the Account Contact field, we’ll select Account
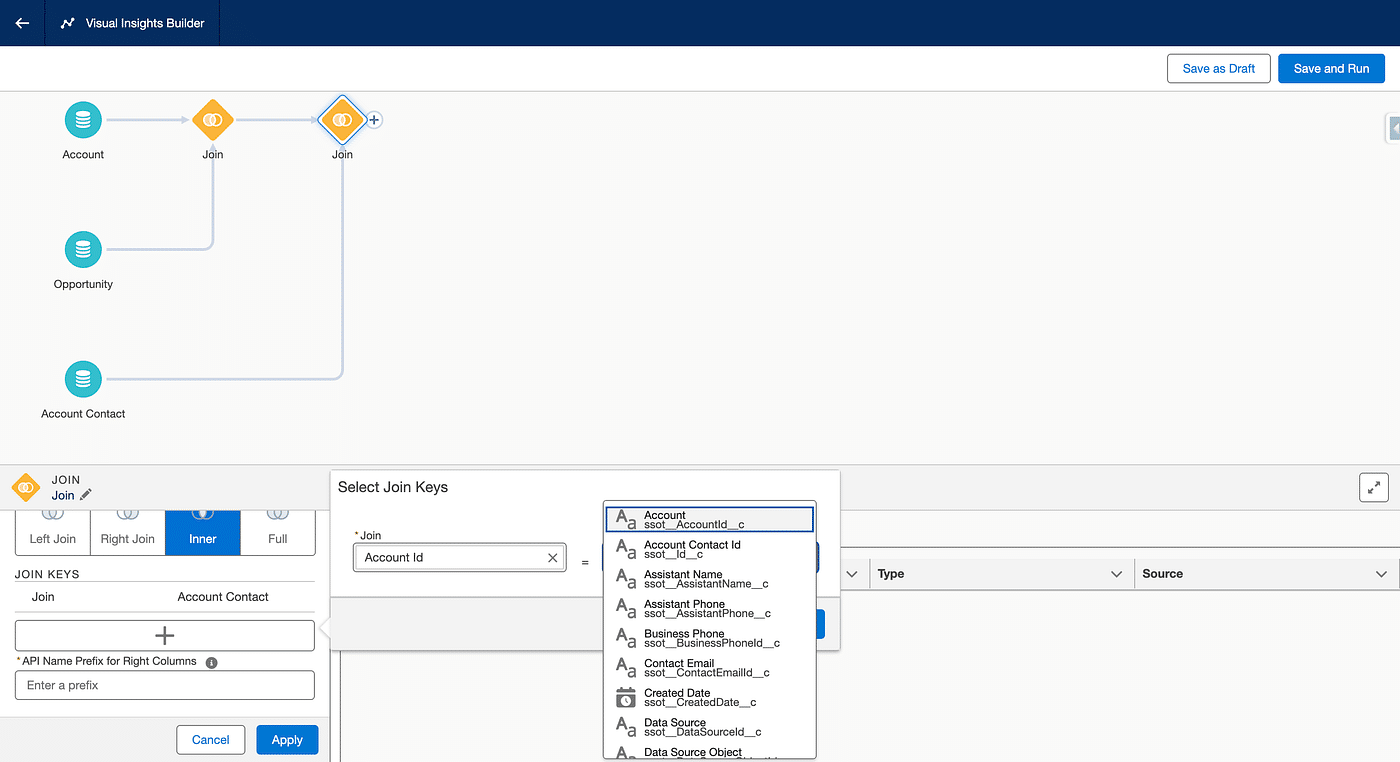
10. Click Apply to save the join keys. Then in the “Enter a Prefix” input at the bottom of the join, enter something like “Account Contact” and click Apply.
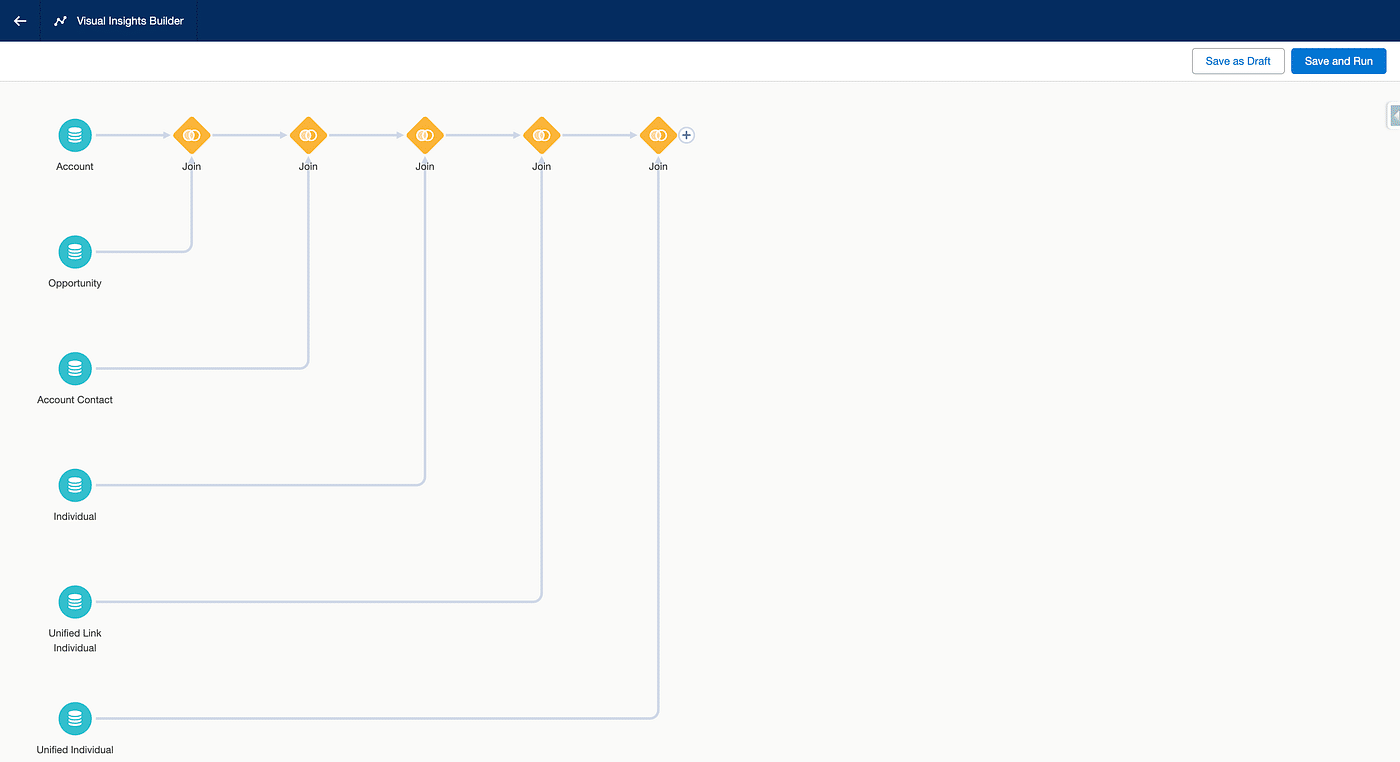
11. We now have Accounts, Opportunities and their Contacts at our finger tips. Let’s add the Individual DMO, by adding another Join with a click on the Plus of the Join we last added and selecting the Individual DMO from the list. The defaults are what we want, so click Apply.
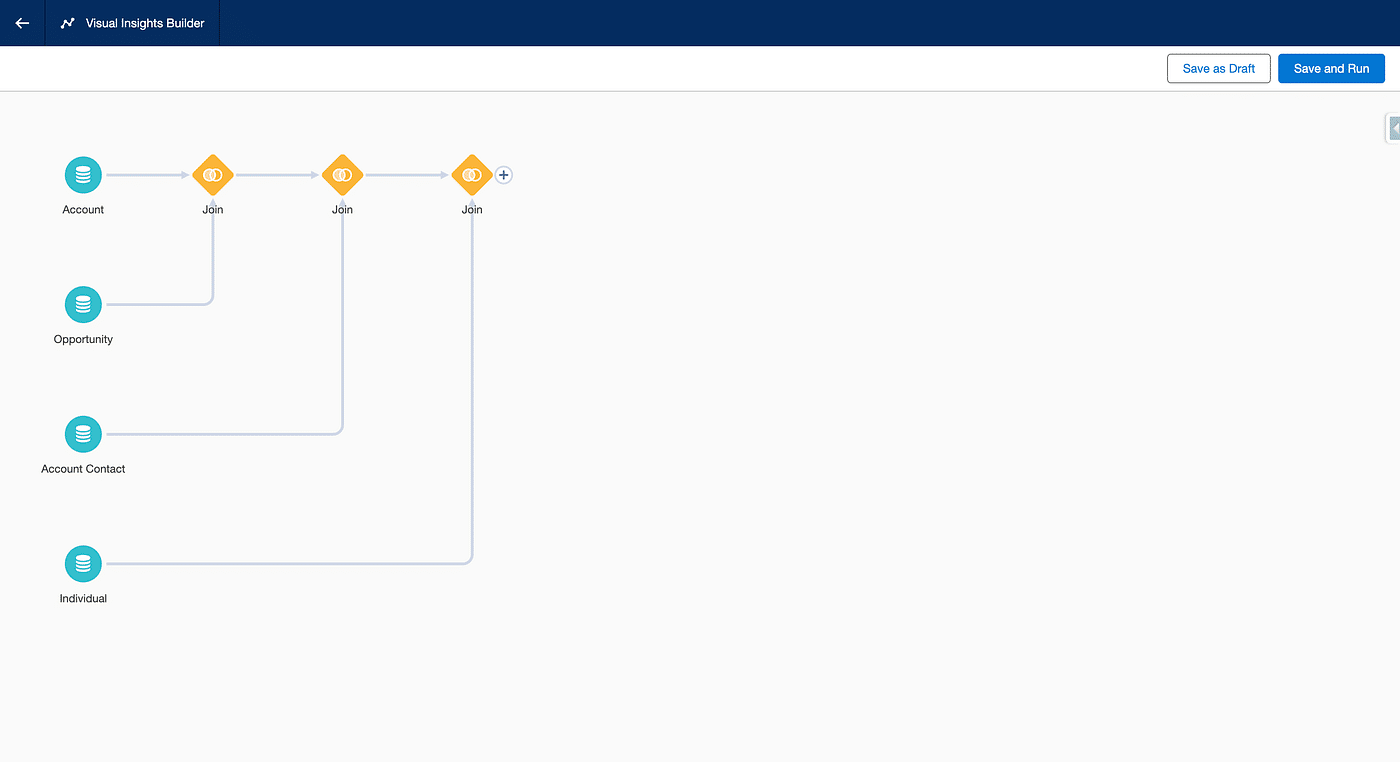
12. We now need to link the Unified Individual DMO. We will use the Unified Link Individual which is where the Indentity Resolution records the relation between a give Unified Individual and its composing Individuals (a Link Object, also called a Bridge in Data Cloud, is very close to SFDC’s junction Objects). So add a new Join to our last one by clicking the + sign and selecting Unified Link Individual.
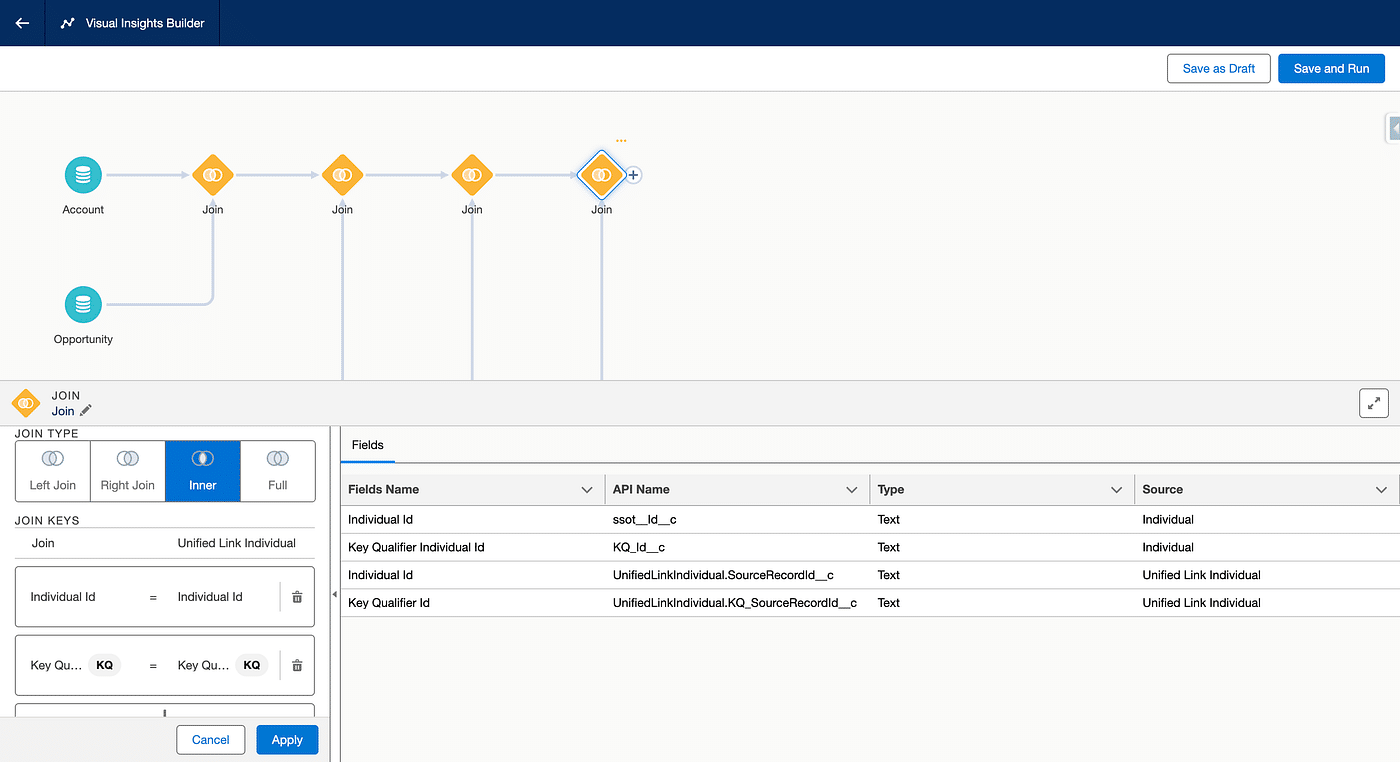
13. The defaults are working for us, click Apply and then anywhere in the canvas. Now let’s add the Unified Individual DMO adding a final Join and keeping the defaults. All our DMOs are now added to the canvas.
14. Before we define the output of our Calculated Insight, we need to filter our opportunities to keep only the Closed Won ones. To let’s click on the plus sign of our final Join activity and select Filters
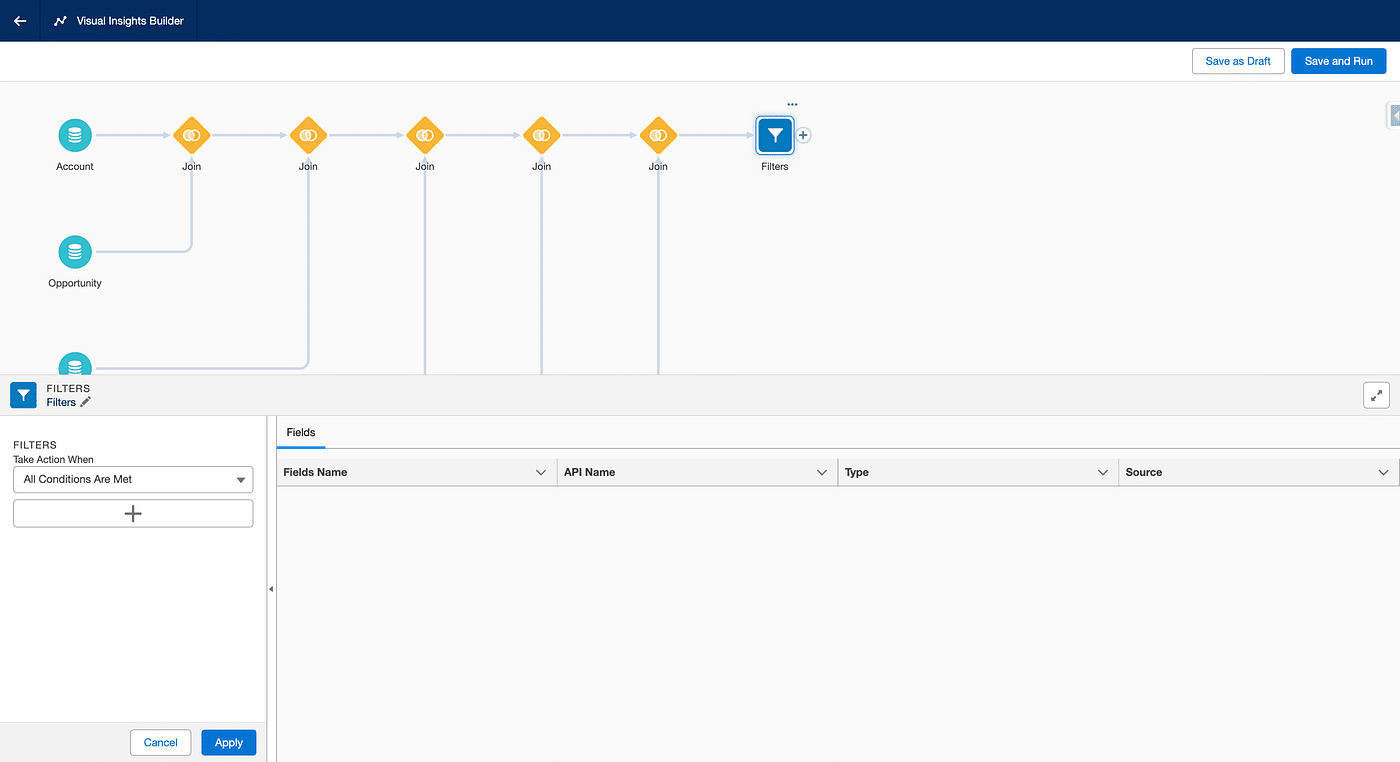
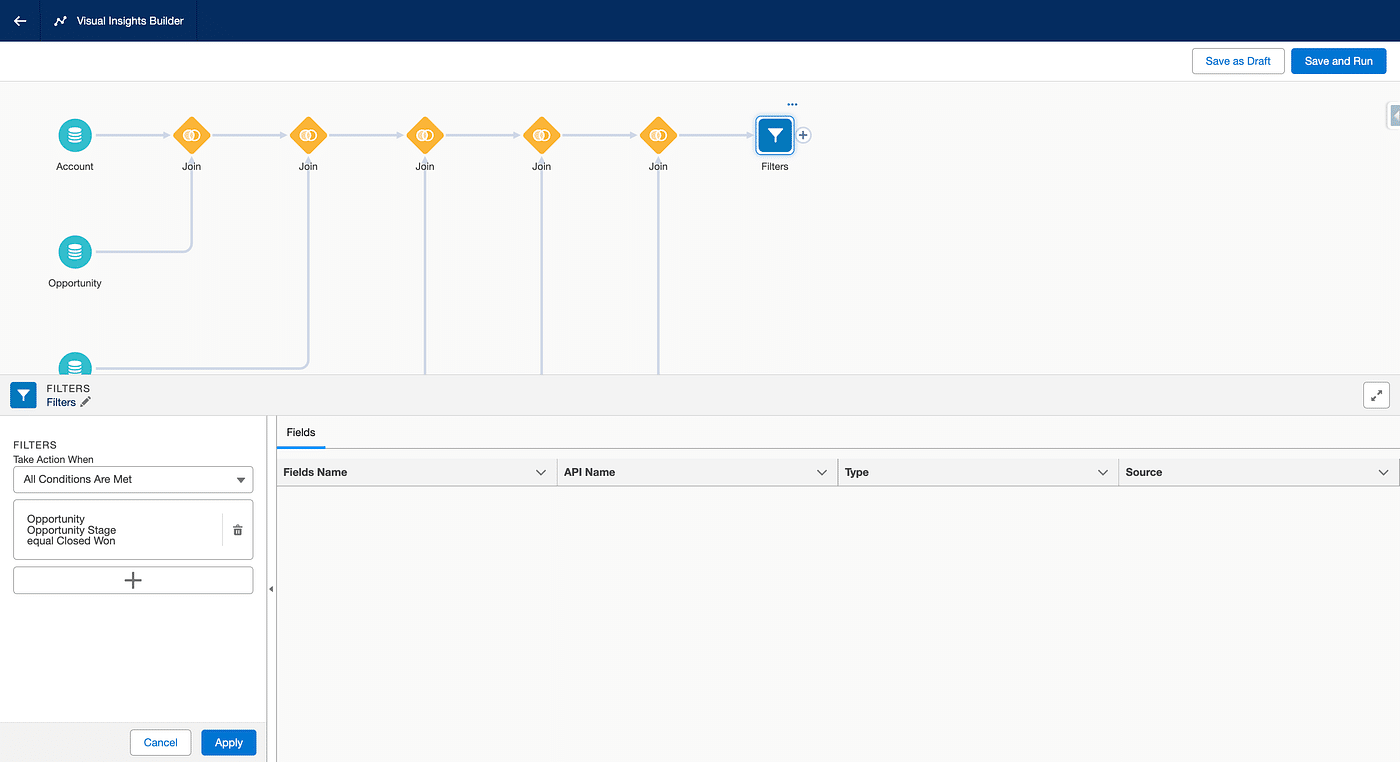
15. Let’s click + under Filters and select Opportunity Stage as a field, then Next. In the options, select “Equals” then “Closed Won” in value and Apply.
16. We now need to group all this datas so we eventually have a line per Unified Individual, along with the sum of all associated and remaining (filtered) Opportunities. Click the + sign of the Filter activity and select Aggregate.
17. Click the + sign under Measure, select Sum and select Total Amount
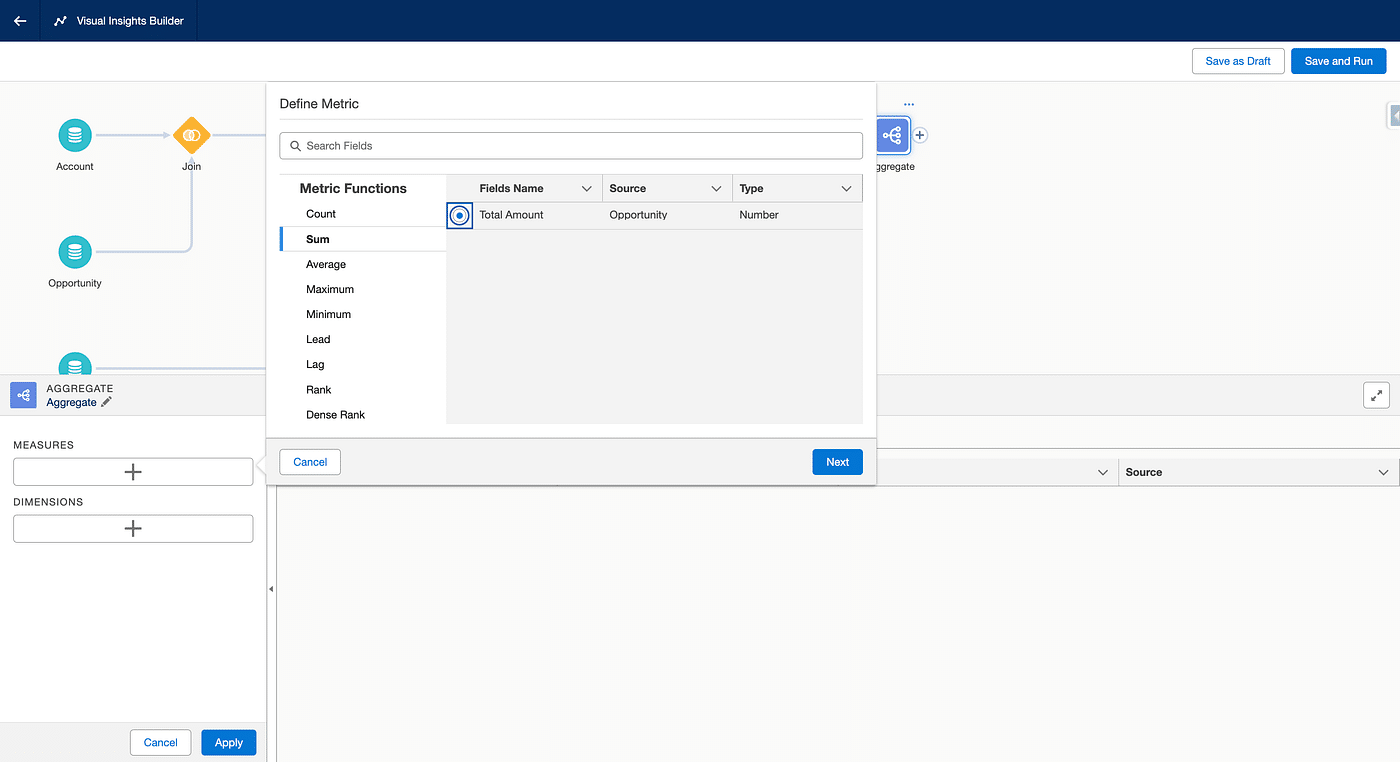
18. Give a Metric Name like CLTV and click Apply. Then click the + sign under Dimensions, and select Unified Individual Id from the Unified Individual DMO (not from the Unified Link Individual, otherwise your calculated Insight could not be embedded on Contact Layouts later on).
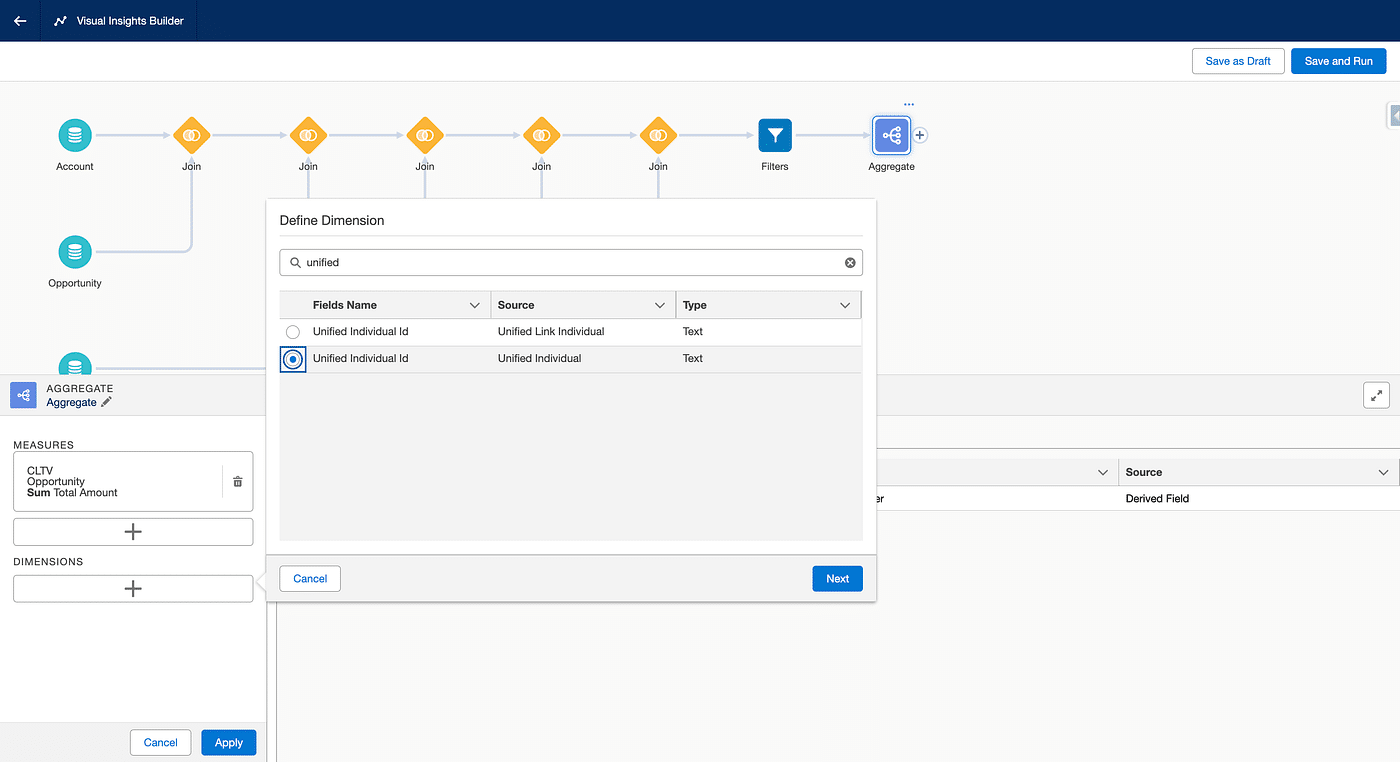
19. Click Next, and give the Dimension a name, like Unified Individual Id, fianally click Apply and anywhere in the canvas. We did it 😎.
let’s Save and Run our CLTV Calculated Insight, give your Insight a name, like “Life Time Value”, click Next and select how often the Calculated Insight should be reevaluated (credits consumed) if you want it to be refreshed, and finally, click Enable. Once saved, clicked Publish Now, and wait for Last Run Status to be displaying ”Success”.

What now?
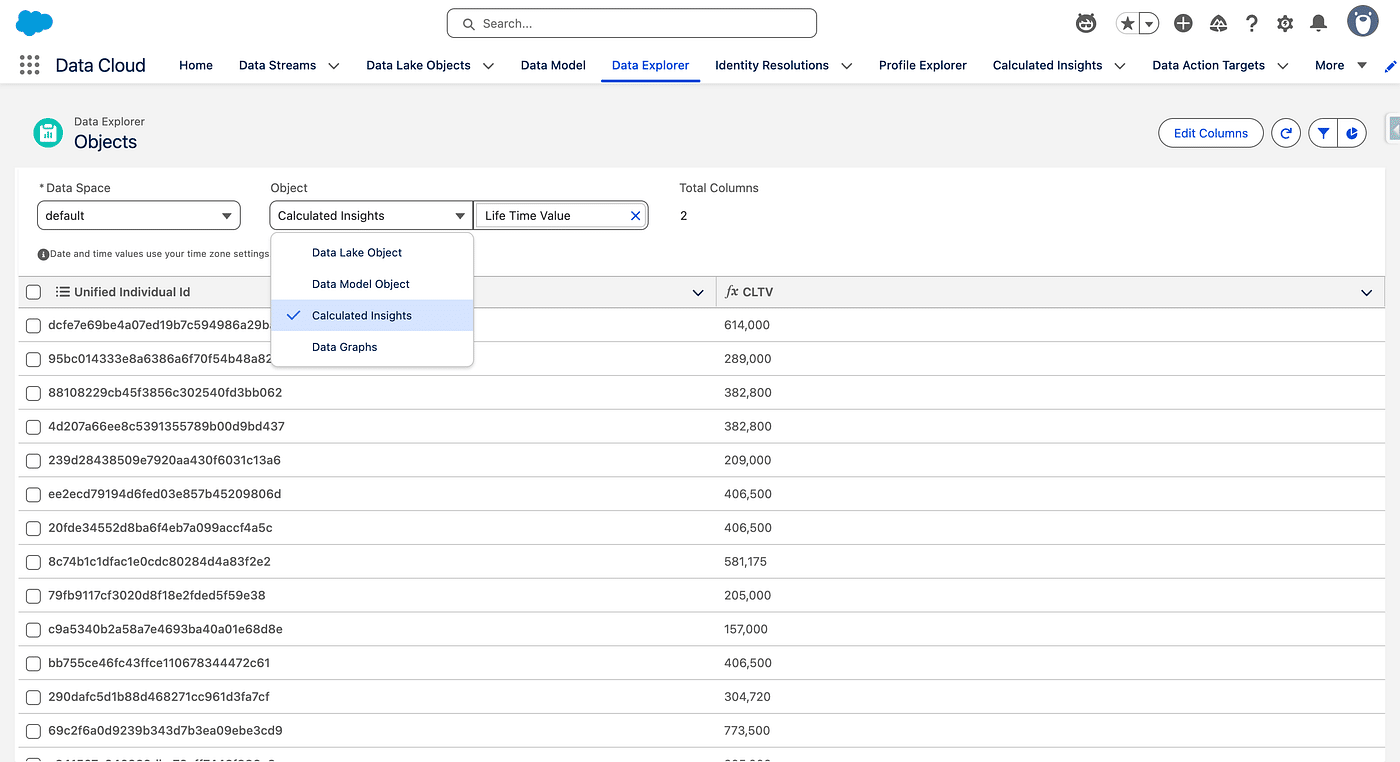
First, let’s see if we have data in our brand new Calculated Insight. In Data Cloud > Data Explorer, select Calculated Insights as an Object, and then the name of the Calculated Insight you want to inspect. You should see something like this.
You can also add the Data Cloud Profile Insights on your Contact Layout in Salesforce, so that you have access to it on every Contact.
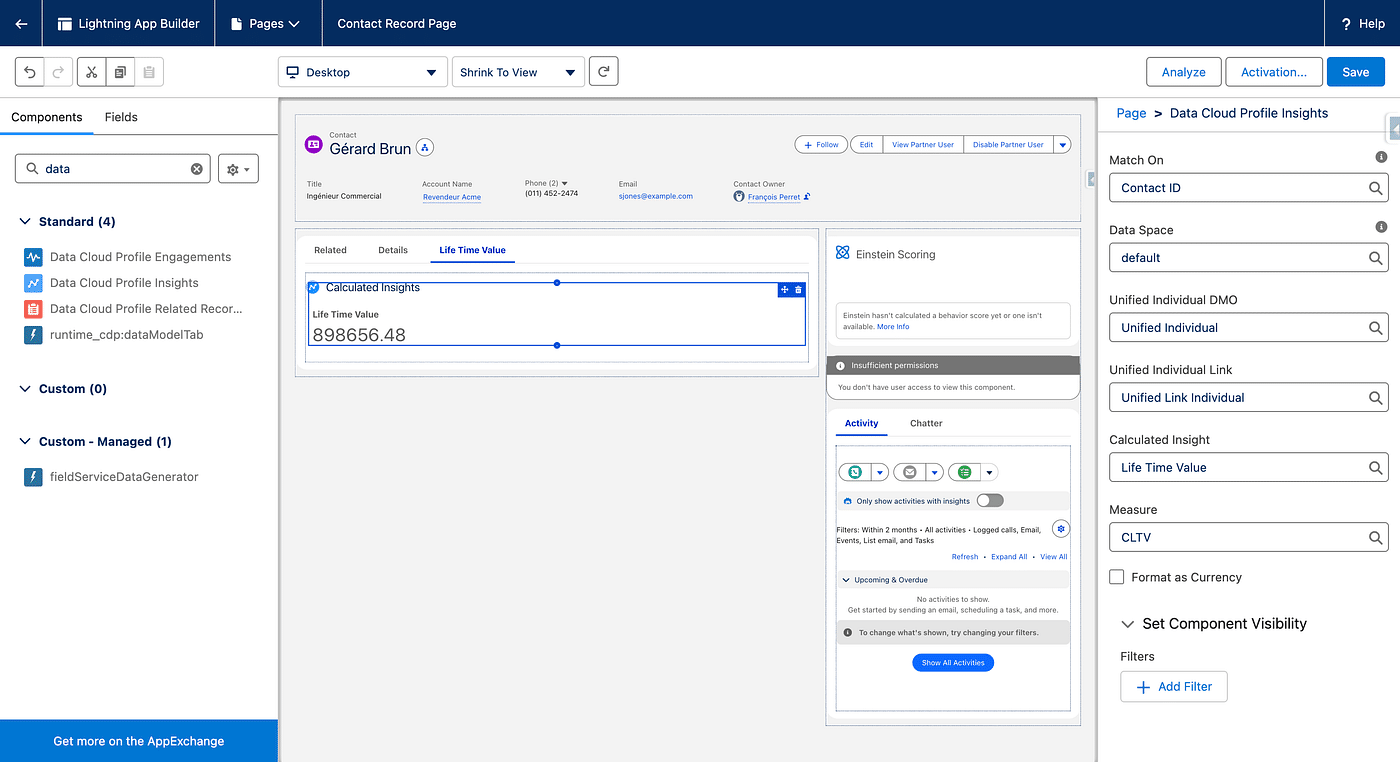
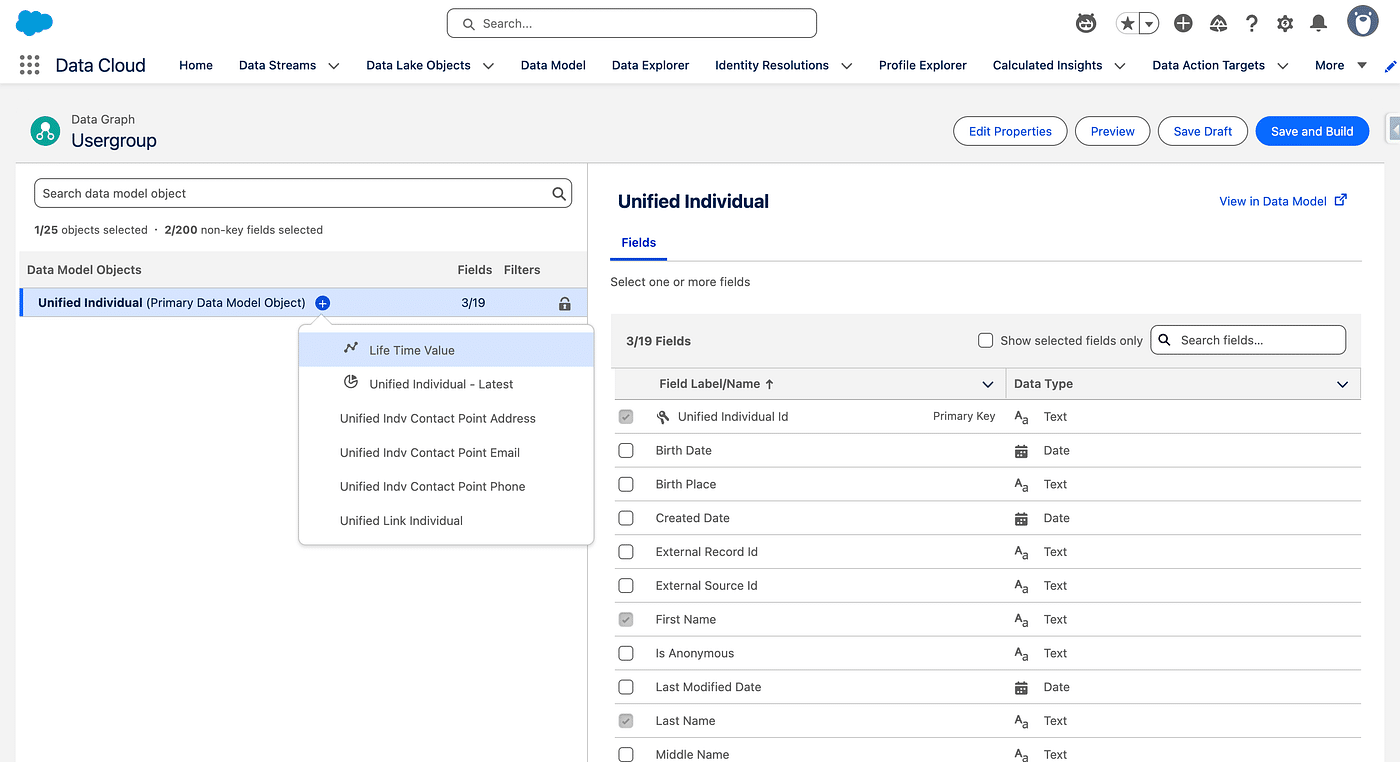
Calculated Insights can also be embedded in a Data Graph:
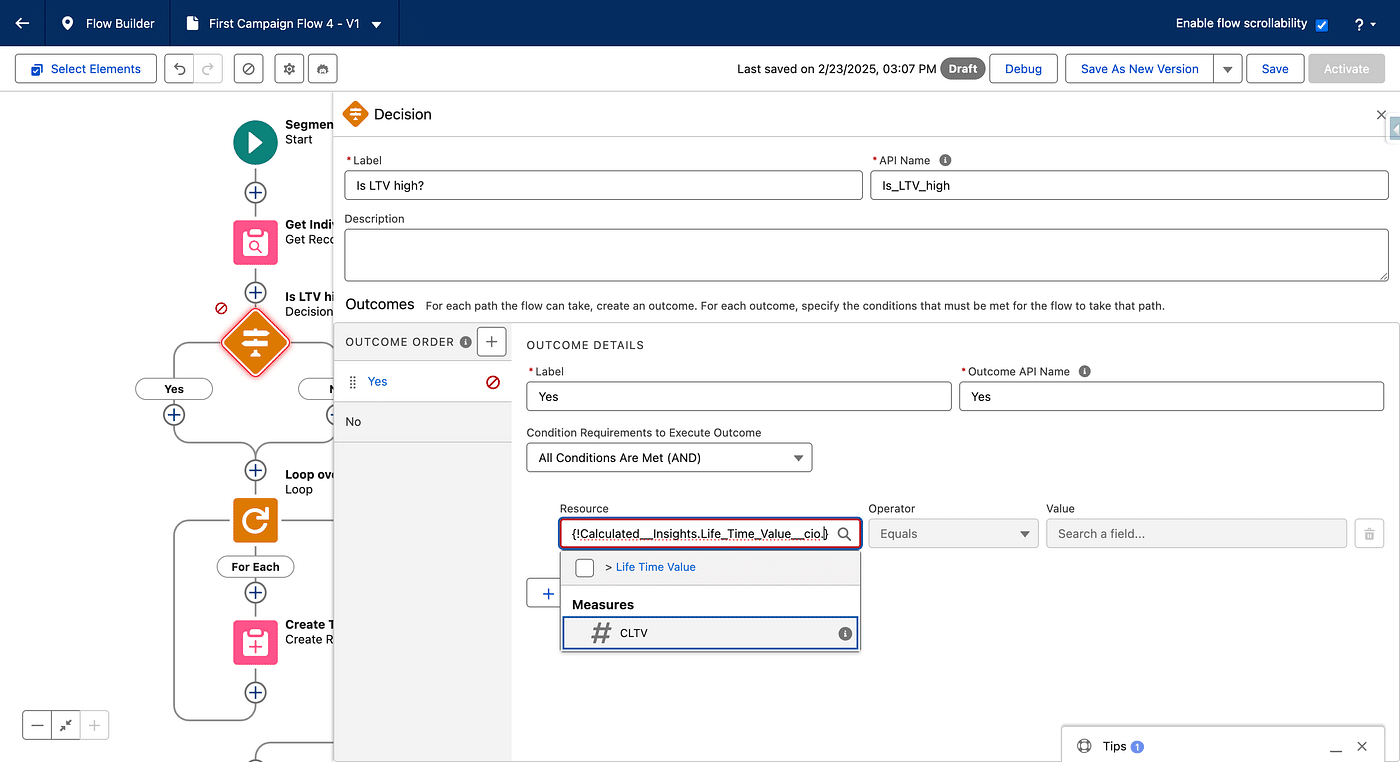
You can then access it from your Email Builder (as Merge Fields, as criteria for Variations/Personalisations) or from you Marketing Flows as Decision Split criteria. Tie CLTV to revenue with Opportunity Influence
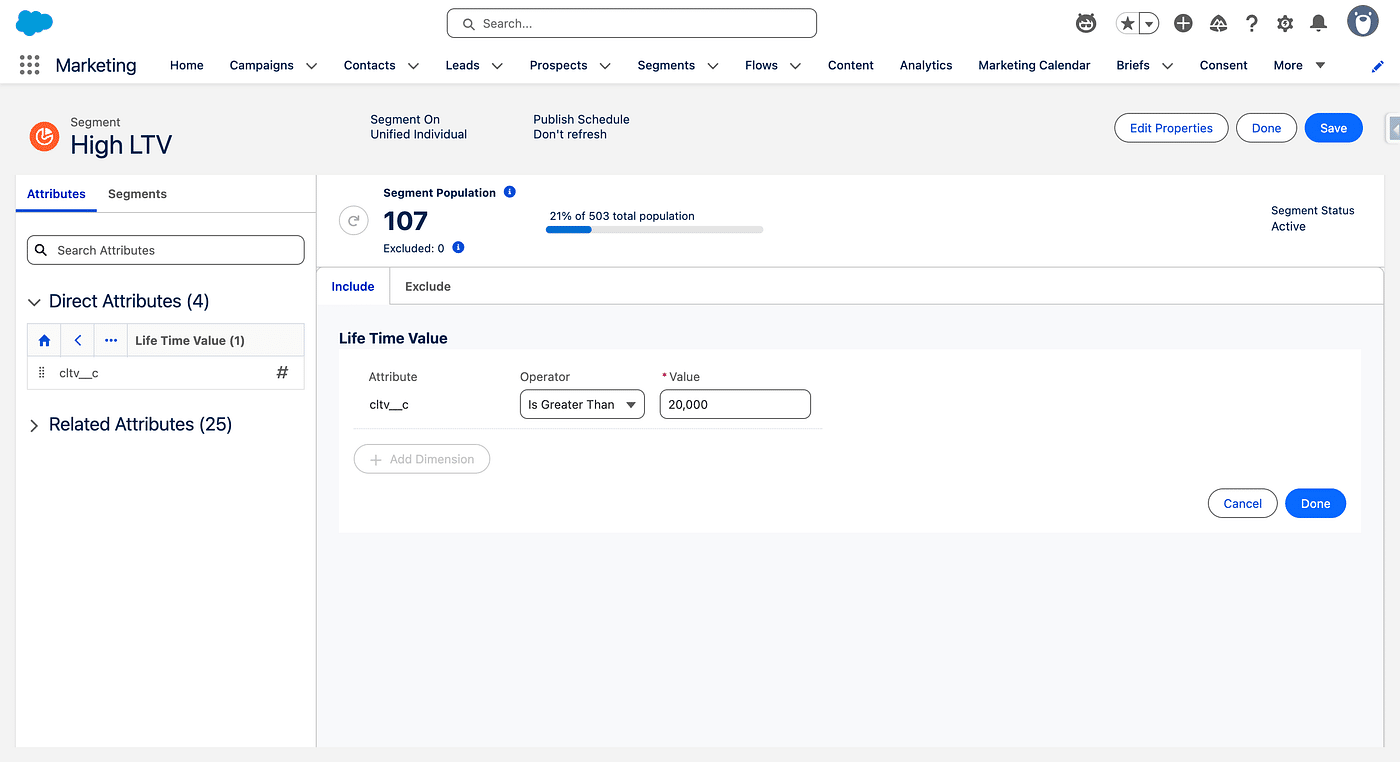
And finally, you can use your Calculated Insights in Segments of Unified Individual, for instance, to identify the most promising customers:
Note that Scoring is done that way in Marketing Cloud Next (Growth and Advanced) and comes out of box. Calculated Insights are really powerful, as you can create every kind of metric you need for your specific Marketing needs.