In Spring ’26, Handlebars, a scripting/templating language, based on Handlebars.Net library was introduced in Marketing Cloud Next. Advanced Marketers and Developers can author, inspect, and update scripts that implement conditional logic or perform data lookups in emails.
One easy way to get a sense of this new feature is to look at how merge fields were handled before and after Handlebars. For instance, a Merge Field added with the Component Drag & Drop Editor would look like this in Code View before Handlebars:
{!$Expression.First_Name}
Since Spring’26, with Handlebars, it will look like this:
{{fallback (get (get @root "$dataGraph") "ssot__FirstName__c") ""}}
Before we dive into the syntax and available features, let’s make a quick intro on what you need to know.
Handlebars basics
Available in Code View
If you created an Email using the Component Drag & Drop Editor, you can access, like we just did, the HTML code of the Email. In that case, the Code is read-only. You can switch to Code View using the toggle </> on top of the Email Builder. Then you can use the Convert to Code button to definitively switch to Code View. Another option is to directly create an Email using the Create with HTML option.

In code view, you get syntax validation, inline coding help, and built-in search. In Preview, you can select a Segment and a Member to display the resulting Email. Hovering over and Handlebar error in the editor gives some insight of what to correct.
Data Sources
Handlebars can act on data available from the Data Sources of the Email. Here are the 4 main Data Source types, presenting a JSON blob with the current recipient’s data:
- Data Graph: In a Data Graph you define what data you want to expose to the Email from Data Cloud DMOs for each Unified Individual. There can be only one Data Graph in an Email and a default one is selected, that you can change. From the Email you access the current Unified Individual’s data with the $dataGraph system variable
- Apex Class: You can pass data from a Flow directly to the Email. Then, you define in the Email the Apex Class used in the Flow, and give a name to the Data Source. Finally, you reference your data for the current receipient using a system variable with the same name as the one you gave to the Data Source.
- Activation: Activation Flows are triggered by a Segment Publish. You define which attributes you want to embed in the Activation, and it is then available in the system variable with the same name as the one you gave to the Data Source.
- Events: Event Trigger Flows, like From Triggered Flows, CRM Record TRiggered Flows or Engagement Signal pass the Event data to the Email, it is then available in the system variable with the same name as the one you gave to the Data Source.
Syntax
Accessing the data root
The first thing you need to do when act on data in the Email, for example for formatting, repeating or introducing conditional logic, is to get access to the Root Data Source, that is the JSON where the data to the current recipient is located.
This can be done using the “Dot” notation:
{{@root.$dataGraph}}
Or the explicit use of the Get function:
{{get @root "$dataGraph"}}
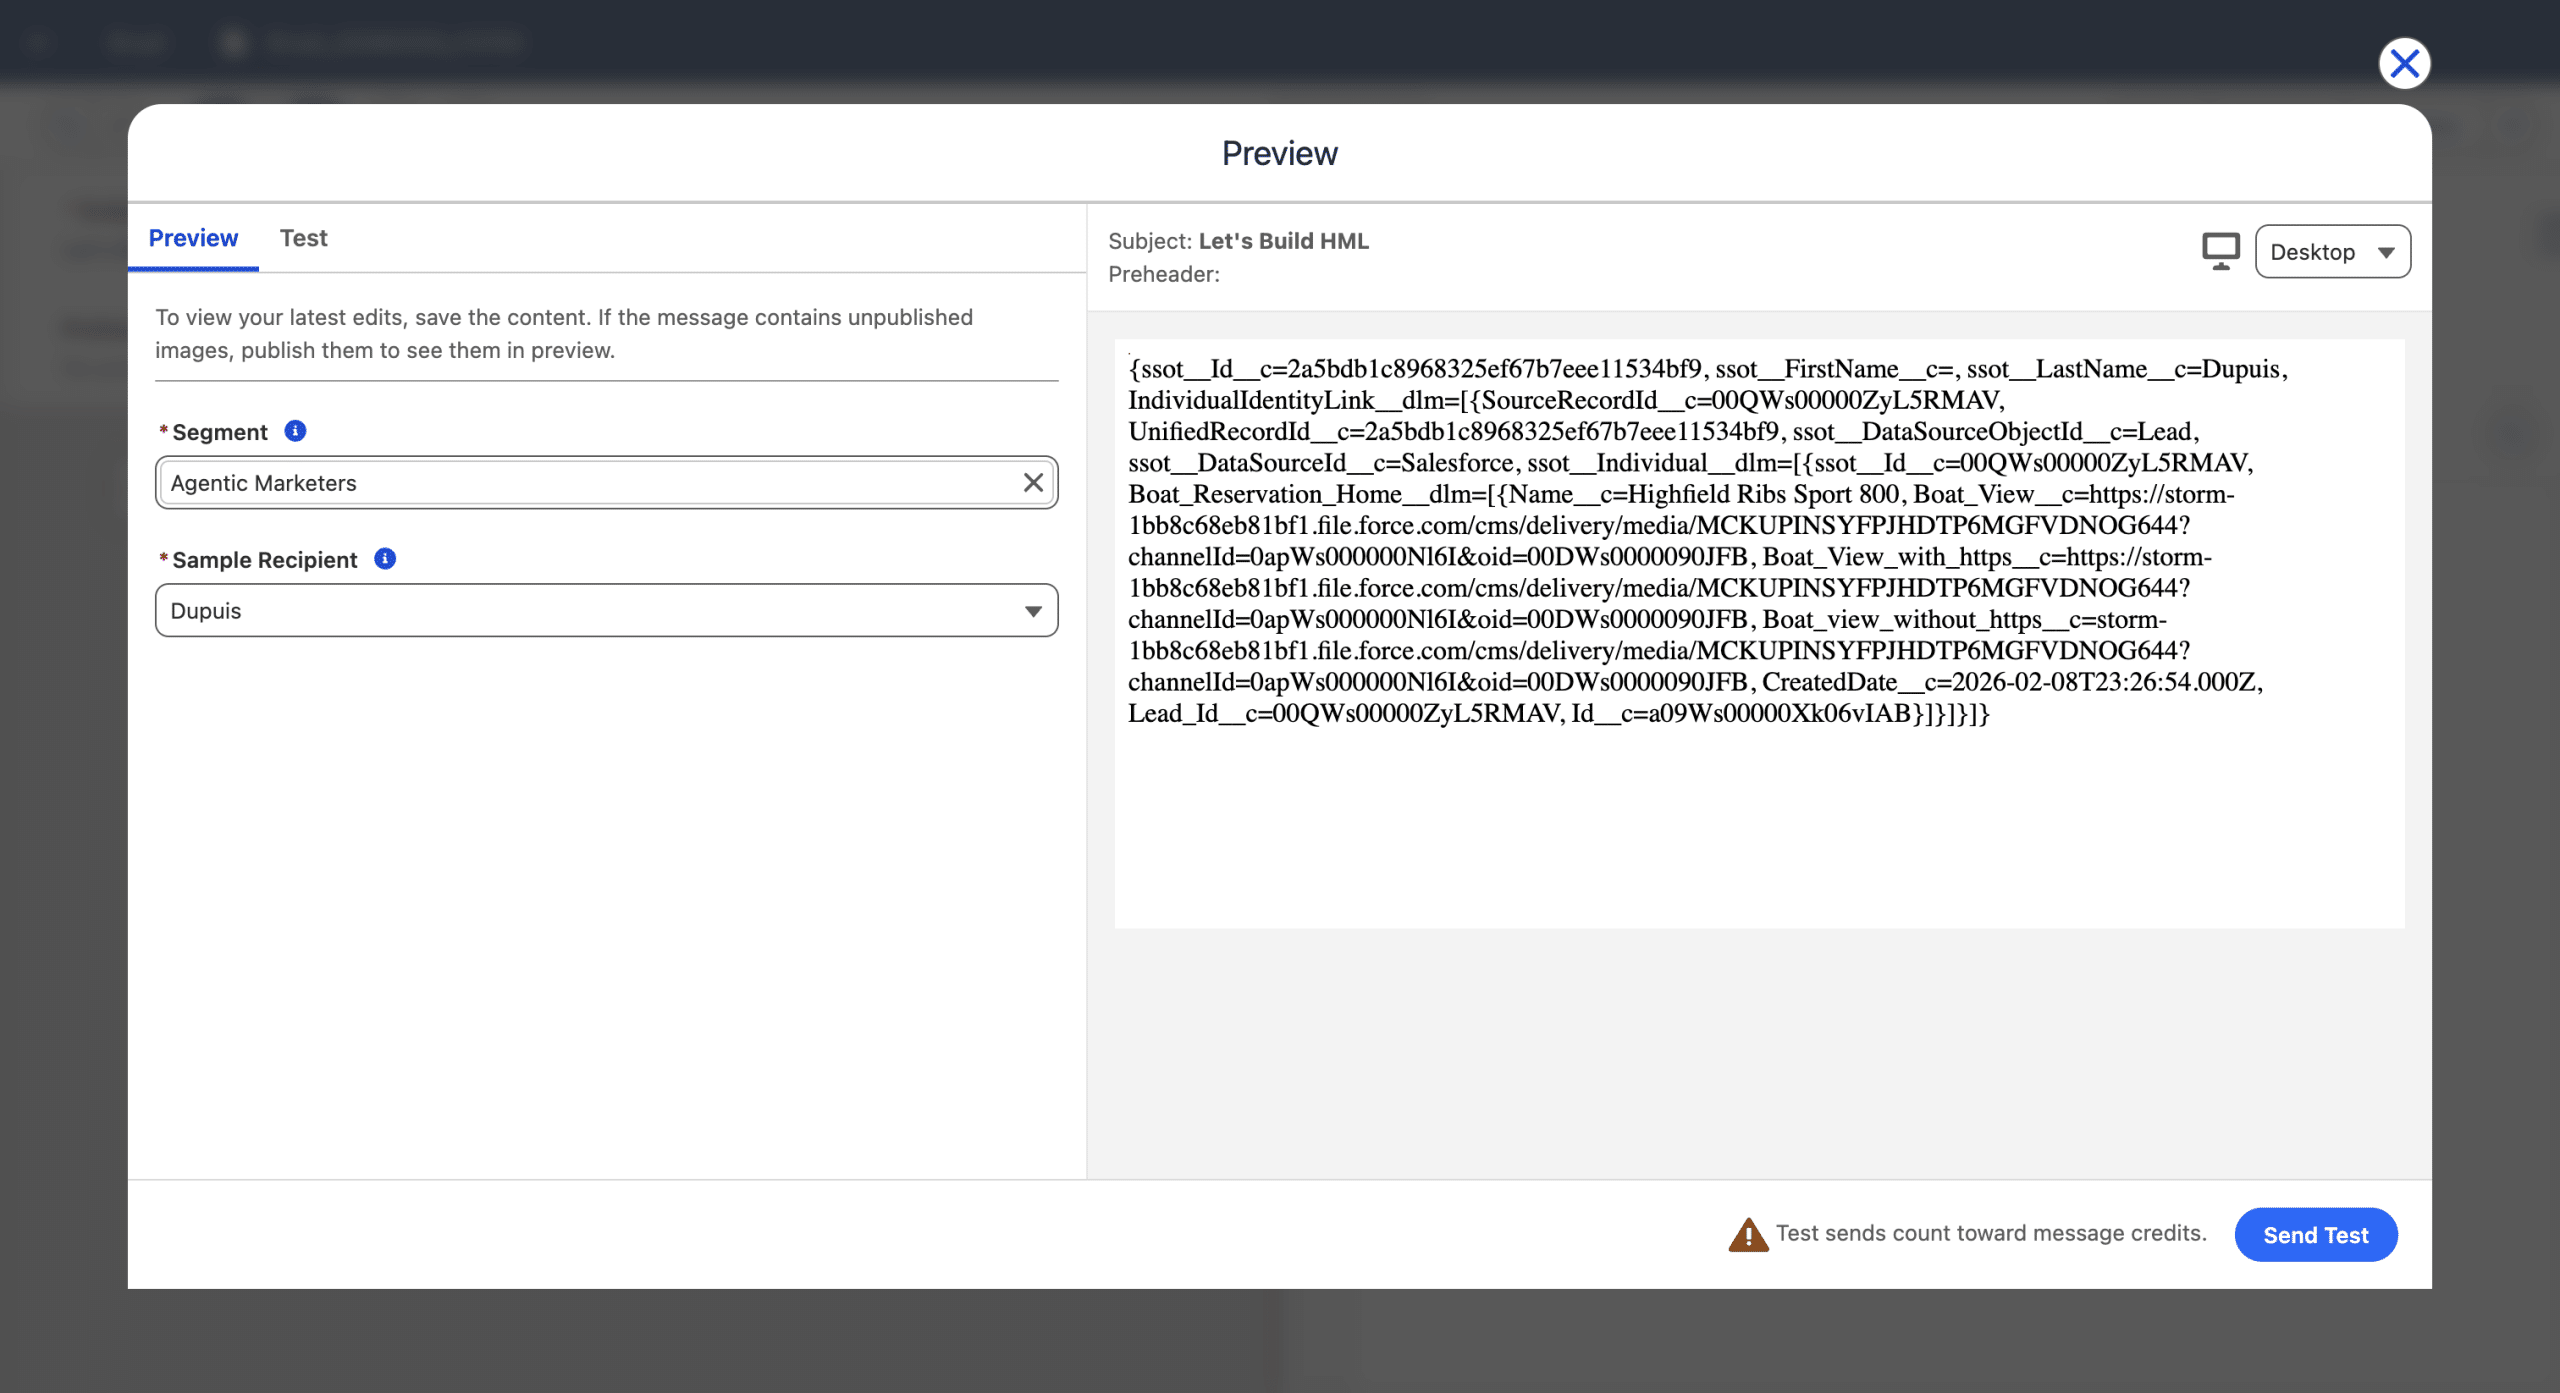
In both cases, the Handlebars code is contained in double curly brackets, sometimes also called Mustaches. Both codes return the raw JSON blob for the current recipient. Preview is an interresting feature to see immediately the generated Email for a given recipient (Save the Email for the Preview to display the latest version).
Navigating the Data
The raw data is useful as a starting point to reach the contained data you want. The raw data associated with previous recipient is coming from the following Data Graph record:
					{
	"ssot__Id__c": "2a5bdb1c8968325ef67b7eee11534bf9",
	"ssot__FirstName__c": "",
	"ssot__LastName__c": "Dupuis",
	"IndividualIdentityLink__dlm": [
		{
			"SourceRecordId__c": "00QWs00000ZyL5RMAV",
			"UnifiedRecordId__c": "2a5bdb1c8968325ef67b7eee11534bf9",
			"ssot__DataSourceObjectId__c": "Lead",
			"ssot__DataSourceId__c": "Salesforce",
			"ssot__Individual__dlm": [
				{
					"ssot__Id__c": "00QWs00000ZyL5RMAV",
					"Boat_Reservation_Home__dlm": [
						{
							"Name__c": "Highfield Ribs Sport 800",
							"Boat_View__c": "https://...",
							"CreatedDate__c": "2026-02-08T23:26:54.000Z",
							"Lead_Id__c": "00QWs00000ZyL5RMAV",
							"Id__c": "a09Ws00000Xk06vIAB"
						}
					]
				}
			]
		}
	]
}
To access the First Name, for example, we can use the Dot notation:
{{@root.$dataGraph.ssot__FirstName__c}}
Or the explicit call to the Get helper function:
{{get (get @root "$dataGraph") "ssot__FirstName__c"}}
Even if both syntaxes can be used to navigate the data, we recommend using the explicit notation rather than the Dot notation: you can then filter and sort objects, which you can’t otherwise. It is very common using Handlebars to see long one-liner code.
Using Handlebars
Example 1: Simple Merge Field
This is a very simple, yet useful code. In the previous section we have already navigated to the First Name, here we’ll break down the steps.
To succesfully use Handlebars, a good approach is to start with the inner expression and expand from there. So, the first step, is to access the root data from the Data Graph.
{{get @root "$dataGraph"}}
Then we’ll use the Get helper function which makes it easy to access a field, another nested object or array inside the JSON. This function takes a current path, and retrieves a data a step further in the path, specified in the second argument. So we start adding parenthesis around the root content.
{{(get @root "$dataGraph")}}
Then, we add the function itself:
{{get (get @root "$dataGraph")}}
And finally the function’s argument, the next step in the path:
{{get (get @root "$dataGraph") "ssot__FirstName__c"}}
As we are navigating the Data Graph, it is very handy to have either its definition in Data Cloud or the JSON blob opened for a specific recipient, to find the path elements’ names.
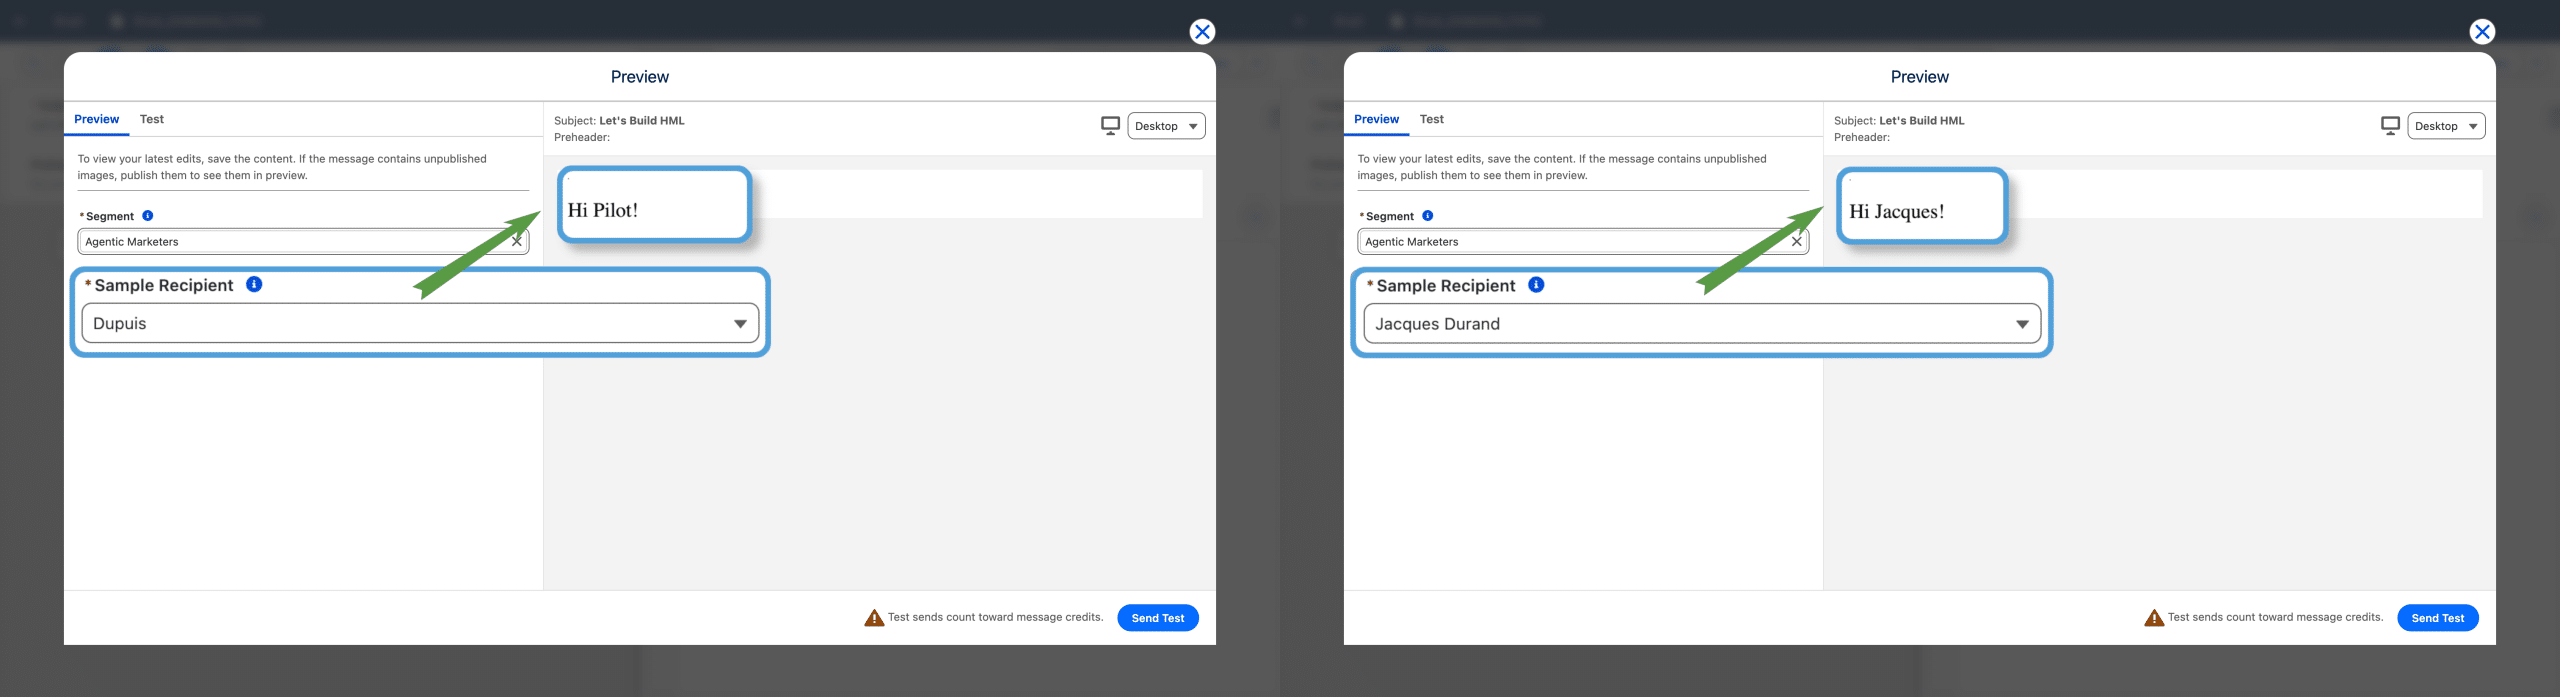
Example 2: Smart “Say Hi” first sentence
The HML Code can be mixed with regular HTML code. So let’s say Hi using the previous code.
<p>Hi {{get (get @root "$dataGraph") "ssot__FirstName__c"}}!</p>
This works perfectly for records with First Names defined, but as seen in our Data Graph above, our recipient used in Preview has no First Name defined. So we’ll need a way to format the sentence in that case (as “Hi !” has an annoyoing extra space). We present two ways of doing this here. In futher example we’ll display a list of Boat Reservations, so here we want to display “Hi Pilot!” if the First Name is not defined, or “Hi Jacques!” is the First Name is Jacques.
The Fallback method
So far we have only the Get method. Lets now use another Handlebars function: Fallback which returns a value specified in the second argument if the first is empty. Again, we start from the inside and work outward, wrapping what we have so far into parenthesis.
<p>Hi {{(get (get @root "$dataGraph") "ssot__FirstName__c")}}!</p>
Adding the Fallback helper function:
<p>Hi {{fallback (get (get @root "$dataGraph") "ssot__FirstName__c")}}!</p>
Then we can define the default value (“Pilot” here):
<p>Hi {{fallback (get (get @root "$dataGraph") "ssot__FirstName__c") "Pilot"}}!</p>
Now we say Hi properly.
Conditional Logic
Handlebars has a several helper functions, and you can easily handle conditional logic with it. We’ll use the If helper function here. Note this helper has a specific syntax, the block start with <#if> and end with </if>. We’ll reuse the code to navigate to the First Name.
					{{#if (get (get @root "$dataGraph") "ssot__FirstName__c")}}
  <p>Hi {{get (get @root "$dataGraph") "ssot__FirstName__c"}}!</p>
{{else}}
  <p>Hi Pilot!</p>
{{/if}}
Using Conditional Logic, you can recreate the Variation feature of the Component Drag & Drop Builder.
Example 3: Loops
Using the Each helper function , we can display a list of things, coming from the Data Source. This is similar to the Repeater feature that you can use when the builder is in Component Drag & Drop Builder mode.
For this example we are a boat renting company and we want to send a monthly recap of booked boats. We already created the Segment to include all Unified Individuals with at least one boat booked in the previous month, and use it in a recurring Segment Triggered Flow.
We’ll use the following JSON, which is the Data Graph record of Unified Individual made of two Individuals, one with 2 boats booked, the other one with 3 boats booked. We want to display a list of boats, sorted by booked day, with their picture (stored in the Boat_View_Field) and the formatted date of renting. That’s a good example of Handlebars power.
					{
	"ssot__FirstName__c": "Jacques",
	"ssot__LastName__c": "Durand",
	"IndividualIdentityLink__dlm": [
		{
			"SourceRecordId__c": "00QWs00000ZyEqLMAV",
			"ssot__Individual__dlm": [
				{
					"ssot__Id__c": "00QWs00000ZyEqLMAV",
					"Boat_Reservation_Home__dlm": [
						{
							"Name__c": "Candela C 8",
							"Boat_View__c": "https:...",
							"CreatedDate__c": "2026-02-08T22:25:49.000Z",
						},
						{
							"Name__c": "Pontoon Sea Doo Switch Cruise",
							"Boat_View__c": "https:...",
							"CreatedDate__c": "2026-02-08T22:24:57.000Z",
						}
					]
				}
			]
		},
		{
			"SourceRecordId__c": "00QWs00000EvvXlMAJ",
			"ssot__Individual__dlm": [
				{
					"ssot__Id__c": "00QWs00000EvvXlMAJ",
					"Boat_Reservation_Home__dlm": [
						{
							"Name__c": "Center Cons Pursuit S 358 Sport",
							"Boat_View__c": "https:...",
							"CreatedDate__c": "2026-02-08T15:57:16.000Z",
						},
						{
							"Name__c": "Bowrider Sea Ray Sundancer 370",
							"Boat_View__c": "https://...",
							"CreatedDate__c": "2026-02-08T15:56:57.000Z",
						},
						{
							"Name__c": "Bass Cat Puma STS",
							"Boat_View__c": "https:...",
							"CreatedDate__c": "2026-02-08T15:56:19.000Z",
						}
					]
				}
			]
		}
	]
}
We need to transform the data by navigating it so we eventually have a sorted list of the 5 Boat Reservations. The First step is to go from the Unified Individual to a list of Individuals.
{{get (get @root "$dataGraph") "IndividualIdentityLink__dlm")}}
By doing so, we started navigating the JSON, which is now an array with the two Individuals.
					[
	{
		"SourceRecordId__c": "00QWs00000ZyEqLMAV",
		"ssot__Individual__dlm": [
			{
				"ssot__Id__c": "00QWs00000ZyEqLMAV",
				"Boat_Reservation_Home__dlm": [
					{
						"Name__c": "Candela C 8",
						"Boat_View__c": "https:...",
						"CreatedDate__c": "2026-02-08T22:25:49.000Z",
					},
					{
						"Name__c": "Pontoon Sea Doo Switch Cruise",
						"Boat_View__c": "https:...",
						"CreatedDate__c": "2026-02-08T22:24:57.000Z",
					}
				]
			}
		]
	},
	{
		"SourceRecordId__c": "00QWs00000EvvXlMAJ",
		"ssot__Individual__dlm": [
			{
				"ssot__Id__c": "00QWs00000EvvXlMAJ",
				"Boat_Reservation_Home__dlm": [
					{
						"Name__c": "Center Cons Pursuit S 358 Sport",
						"Boat_View__c": "https:...",
						"CreatedDate__c": "2026-02-08T15:57:16.000Z",
					},
					{
						"Name__c": "Bowrider Sea Ray Sundancer 370",
						"Boat_View__c": "https://...",
						"CreatedDate__c": "2026-02-08T15:56:57.000Z",
					},
					{
						"Name__c": "Bass Cat Puma STS",
						"Boat_View__c": "https:...",
						"CreatedDate__c": "2026-02-08T15:56:19.000Z",
					}
				]
			}
		]
	}
]
From there, we want to access the content of each Individuals, we cannot use the Get helper function here, as we are trying to extract the ssot__Individual__dlm Field, which is nested in each Individual. We’ll use the Map helper function for this, which has a similar syntax as Get.
{{map (get (get @root "$dataGraph") "IndividualIdentityLink__dlm") "ssot__Individual__dlm"}}
We are getting closer to the list of reservations we are looking for, this is what the data looks like so far:
					[
	[
		{
			"ssot__Id__c":"00QWs00000ZyEqLMAV",
			"Boat_Reservation_Home__dlm":[
				{"Name__c":"Candela C 8", "Boat_View__c":"https://...", "CreatedDate__c":"2026-02-08T22:25:49.000Z"},
				{"Name__c":"Pontoon Sea Doo Switch Cruise", "Boat_View__c":"https://...", "CreatedDate__c":"2026-02-08T22:24:57.000Z"}
			]
		}
	],
	[
		{
			"ssot__Id__c":"00QWs00000EvvXlMAJ",
			"Boat_Reservation_Home__dlm":[
				{"Name__c":"Center Cons Pursuit S 358 Sport", "Boat_View__c":"https://...", "CreatedDate__c":"2026-02-08T15:57:16.000Z"},
				{"Name__c":"Bowrider Sea Ray Sundancer 370", "Boat_View__c":"https://...", "CreatedDate__c":"2026-02-08T15:56:57.000Z"},
				{"Name__c":"Bass Cat Puma STS", "Boat_View__c":"https://...", "CreatedDate__c":"2026-02-08T15:56:19.000Z"}
			]
		}
	]
]
Our next step is to flatten the structure. We’ll use the flatten helper function for this. This is a very common pattern to use the Map and the Flatten helpers in an Handlebars data transformation.
{{flatten(map (get (get @root "$dataGraph") "IndividualIdentityLink__dlm") "ssot__Individual__dlm")}}
Once applied, there is a little difference: a level of nesting data has been removed.
					[
    {
    	"ssot__Id__c":"00QWs00000ZyEqLMAV",
    	"Boat_Reservation_Home__dlm":[
    		{"Name__c":"Candela C 8", "Boat_View__c":"https://...", "CreatedDate__c":"2026-02-08T22:25:49.000Z"},
    		{"Name__c":"Pontoon Sea Doo Switch Cruise", "Boat_View__c":"https://...", "CreatedDate__c":"2026-02-08T22:24:57.000Z"}
    	]
    }, {
    	"ssot__Id__c":"00QWs00000EvvXlMAJ",
    	"Boat_Reservation_Home__dlm":[
    		{"Name__c":"Center Cons Pursuit S 358 Sport", "Boat_View__c":"https://...", "CreatedDate__c":"2026-02-08T15:57:16.000Z"},
    		{"Name__c":"Bowrider Sea Ray Sundancer 370", "Boat_View__c":"https://...", "CreatedDate__c":"2026-02-08T15:56:57.000Z"},
    		{"Name__c":"Bass Cat Puma STS", "Boat_View__c":"https://...", "CreatedDate__c":"2026-02-08T15:56:19.000Z"}
    	]
    }
]
Finally, we need to go to at the Boat reservation level, which we do by using the Map helper function again, to extract the data from the Boat_Reservation_Home__dlm Field.
{{map (flatten(map (get (get @root "$dataGraph") "IndividualIdentityLink__dlm") "ssot__Individual__dlm")) "Boat_Reservation_Home__dlm"}}
The resulting data is as follow:
					[
	[
		{"Name__c":"Candela C 8", "Boat_View__c":"https://...", "CreatedDate__c":"2026-02-08T22:25:49.000Z"},
		{"Name__c":"Pontoon Sea Doo Switch Cruise", "Boat_View__c":"https://...", "CreatedDate__c":"2026-02-08T22:24:57.000Z"}
	],
	[
		{"Name__c":"Center Cons Pursuit S 358 Sport", "Boat_View__c":"https://...", "CreatedDate__c":"2026-02-08T15:57:16.000Z"},
		{"Name__c":"Bowrider Sea Ray Sundancer 370", "Boat_View__c":"https://...", "CreatedDate__c":"2026-02-08T15:56:57.000Z"},
		{"Name__c":"Bass Cat Puma STS", "Boat_View__c":"https://...", "CreatedDate__c":"2026-02-08T15:56:19.000Z"}
	]
]
Perfect data to be flattened (see the pattern Map/Flatten there?):
					[
	{"Name__c":"Candela C 8", "Boat_View__c":"https://...", "CreatedDate__c":"2026-02-08T22:25:49.000Z"},
	{"Name__c":"Pontoon Sea Doo Switch Cruise", "Boat_View__c":"https://...", "CreatedDate__c":"2026-02-08T22:24:57.000Z"},
	{"Name__c":"Center Cons Pursuit S 358 Sport", "Boat_View__c":"https://...", "CreatedDate__c":"2026-02-08T15:57:16.000Z"},
	{"Name__c":"Bowrider Sea Ray Sundancer 370", "Boat_View__c":"https://...", "CreatedDate__c":"2026-02-08T15:56:57.000Z"},
	{"Name__c":"Bass Cat Puma STS", "Boat_View__c":"https://...", "CreatedDate__c":"2026-02-08T15:56:19.000Z"}
]
The data is now almost ready to be used in a loop. We need to sort the reservations by increasing creation date. For this, we’ll use the Sort helper function.
{{ sort(flatten(map (flatten(map (get (get @root "$dataGraph") "IndividualIdentityLink__dlm") "ssot__Individual__dlm")) "Boat_Reservation_Home__dlm")) "CreatedDate__c" "asc" "date"}}
Our list now sorted.
					[
	{"Name__c":"Bass Cat Puma STS", "Boat_View__c":"https://...", "CreatedDate__c":"2026-02-08T15:56:19.000Z"},
	{"Name__c":"Bowrider Sea Ray Sundancer 370", "Boat_View__c":"https://...", "CreatedDate__c":"2026-02-08T15:56:57.000Z"},
	{"Name__c":"Center Cons Pursuit S 358 Sport", "Boat_View__c":"https://...", "CreatedDate__c":"2026-02-08T15:57:16.000Z"},
	{"Name__c":"Pontoon Sea Doo Switch Cruise", "Boat_View__c":"https://...", "CreatedDate__c":"2026-02-08T22:24:57.000Z"},
	{"Name__c":"Candela C 8", "Boat_View__c":"https://...", "CreatedDate__c":"2026-02-08T22:25:49.000Z"}
]
Before we loop over our records to display them in the email, let’s display our Handlebars code in a more readable way (this is for the purpose of giving clarity on each step, usually, we let the code as a one-liner).
					{{
sort(
  flatten(
    map (
      flatten(
        map(
          get(
            get @root "$dataGraph"
          ) "IndividualIdentityLink__dlm"
        ) "ssot__Individual__dlm"
      )
    ) "Boat_Reservation_Home__dlm")
  ) "CreatedDate__c" "asc" "date"
}}
The With helper function is handy to temporarily switch the context to a specific object, so you can access its properties without repeating the object name (think of it as a Variable). Here we will define a Context and name it Reservation.
					{{#with (sort(flatten(map (flatten(map (get (get @root "$dataGraph") "IndividualIdentityLink__dlm") "ssot__Individual__dlm")) "Boat_Reservation_Home__dlm")) "CreatedDate__c" "asc" "date") as |Reservation|}}
{{/with}}
We can now use the Each helper function to loop over our reservations. Inside the loop, we have access to the Context defined with the With previous function, as well as an @index variable referencing the record number (starting with 0) in the list of reservation. Let’s use it to display the Reservations’ name extracted with a new Get helper call:
					{{#with (sort(flatten(map (flatten(map (get (get @root "$dataGraph") "IndividualIdentityLink__dlm") "ssot__Individual__dlm")) "Boat_Reservation_Home__dlm")) "CreatedDate__c" "asc" "date") as |Reservation|}}
  {{#each Reservation}}
    <p>{{get (get Reservation @index) "Name__c"}}</p>
  {{/each}}
{{/with}}
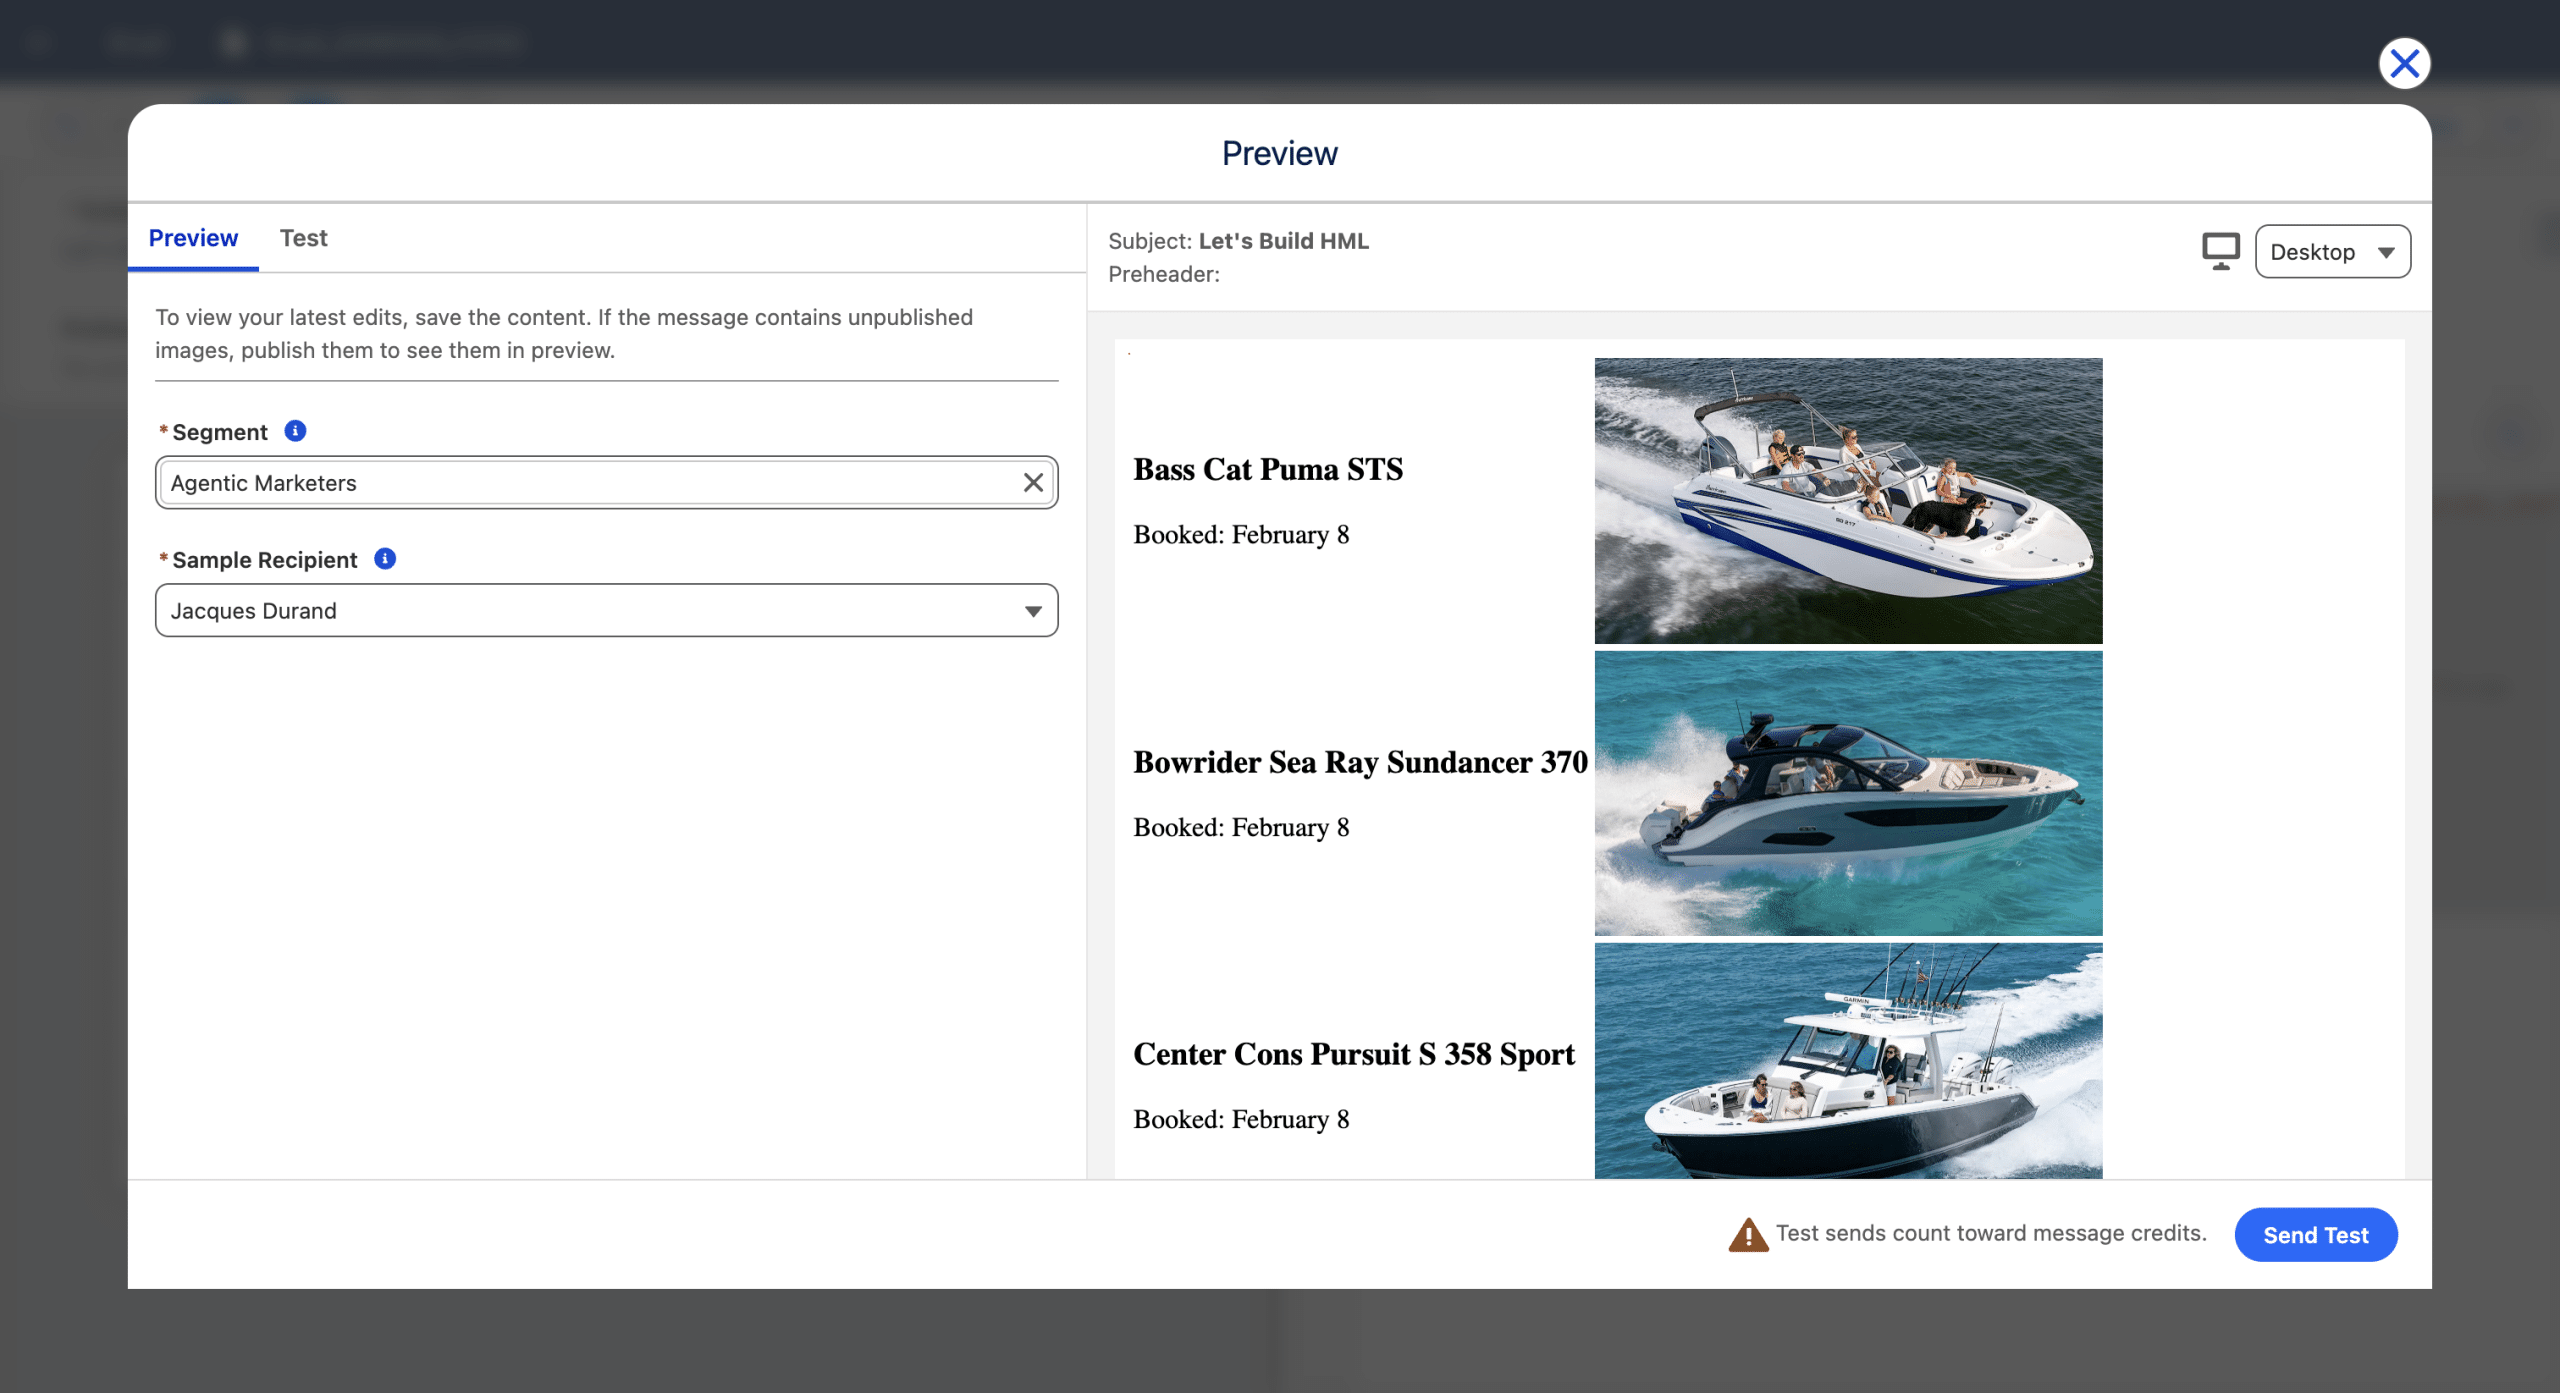
Finally, we will use a table to display each reservation. The boat model and booking date will be displayed in the left cell and the picture of the boat on the right one. Every reservation will be displayed according to this format, which is why Handlebars is also called a templating language.
					{{#with (sort(flatten(map (flatten(map (get (get @root "$dataGraph") "IndividualIdentityLink__dlm") "ssot__Individual__dlm")) "Boat_Reservation_Home__dlm")) "CreatedDate__c" "asc" "date") as |Reservation|}}
  <table>
    {{#each Reservation}}
      <tr>
        <td>
          <h3>{{get (get Reservation @index) "Name__c"}}</h3>
          <p>Booked: {{format (get (get Reservation @index) "CreatedDate__c") "M" "date"}}</p>
        </td>
        <td>
           <img decoding="async" width="300" src="{{get (get Reservation @index) 'Boat_View__c'}}" class="no-lazyload">
        </td>
      </tr>
    {{/each}}
  </table>
{{/with}}
We also used the Format helper function to display the date in a more visual way. And here is the result:
We can enhance the email, by adding a small paragraph inside the With block and before the Each loop. The content of the paragraph must be different depending on the number of past boat reservations (one or more). For this we’ll use the Equals and Length help functions and the If conditional logic. Here is what we can add:
					{{#if (equals (length Reservation) 1)}}
    <p>Here is your reservation:</p>
{{else}}
    <p>Here are your {{length Reservation}} reservations:</p>
{{/if}}
We could also use the Modulo helper function inside the Each loop, to check if the current index is even or odd and display the image on the left of the table or on the right accordingly.
Final thoughts
While the drag-and-drop Component editor already offers Variations and Repeaters, Handlebars gives us additional options and greater flexibility.
Here is the complete list of helper functions. They cover comparison, date, math, object and list, personalization, string and utility. Have fun!