This step-by-step guide is designed for busy marketers or consultants who want to quickly test Marketing Cloud Next (Growth & Advanced). You’ll set up the essentials, try out the platform, and send your first email, focusing only on what matters most.
This guide was written with Partners and SDO Orgs in mind, but you can follow the exact same steps, if you are a regular Customer (either converging from Pardot or starting from scratch): just skip step#1 and step#2.
Create the playground
Step #1. Get a SDO
Partners can get a new playground environment in Partner Learning Camp, called SDO. Those are ideal for demos, so once you’ve completed this article, you’ll be able to keep using your Org, continue configuring it, and use it for demos or experiments. The playground environment gives you access to the full range of Marketing Cloud Advanced features.
From Partner Learning Camp, go to Demo Org and select SDO.
Fill the Form with the required informations, wait for an Email from Salesforce stating to change your password, and you’re good to go.
Basic Setup
Step #2. Activate Data Cloud
In Setup, search for Marketing Cloud in the Quick Find (do not use the orange Marketing Setup, it is Pardot setup). Click Assistant Home.
Then, from the Basic Section of the Page, click Go To Basic Settings (or click Basic Settings in the left sidebar).
Click Go to Data Cloud Setup (as a System Administrator)
Then Get Started. After some time, you are redirected to a Welcome page. Data Cloud is up and running.
Step #3. Setting the Permissions
You can now get back to the Basic Settings (Settings, then search for Marketing Cloud, then click Basic Settings on the left sidebar). You should see something like the following. The Install button is grayed out, so we’ll need to adjust the Permissions.
Among other steps triggered once Data Cloud was activated, the enhanced CMS used to store your assets (Emails, Landing Pages, etc) is created and a Marketing Subscription as well.
We need to add some permission sets to our current User. Go to Settings > Users and choose your User. Then hover over Permission Set Assignments and click Edit Assignment:
Then, add Data Cloud Admin by selecting it on the left and clicking the horizontal arrow.
Do the same with the Marketing Cloud Permission Set.
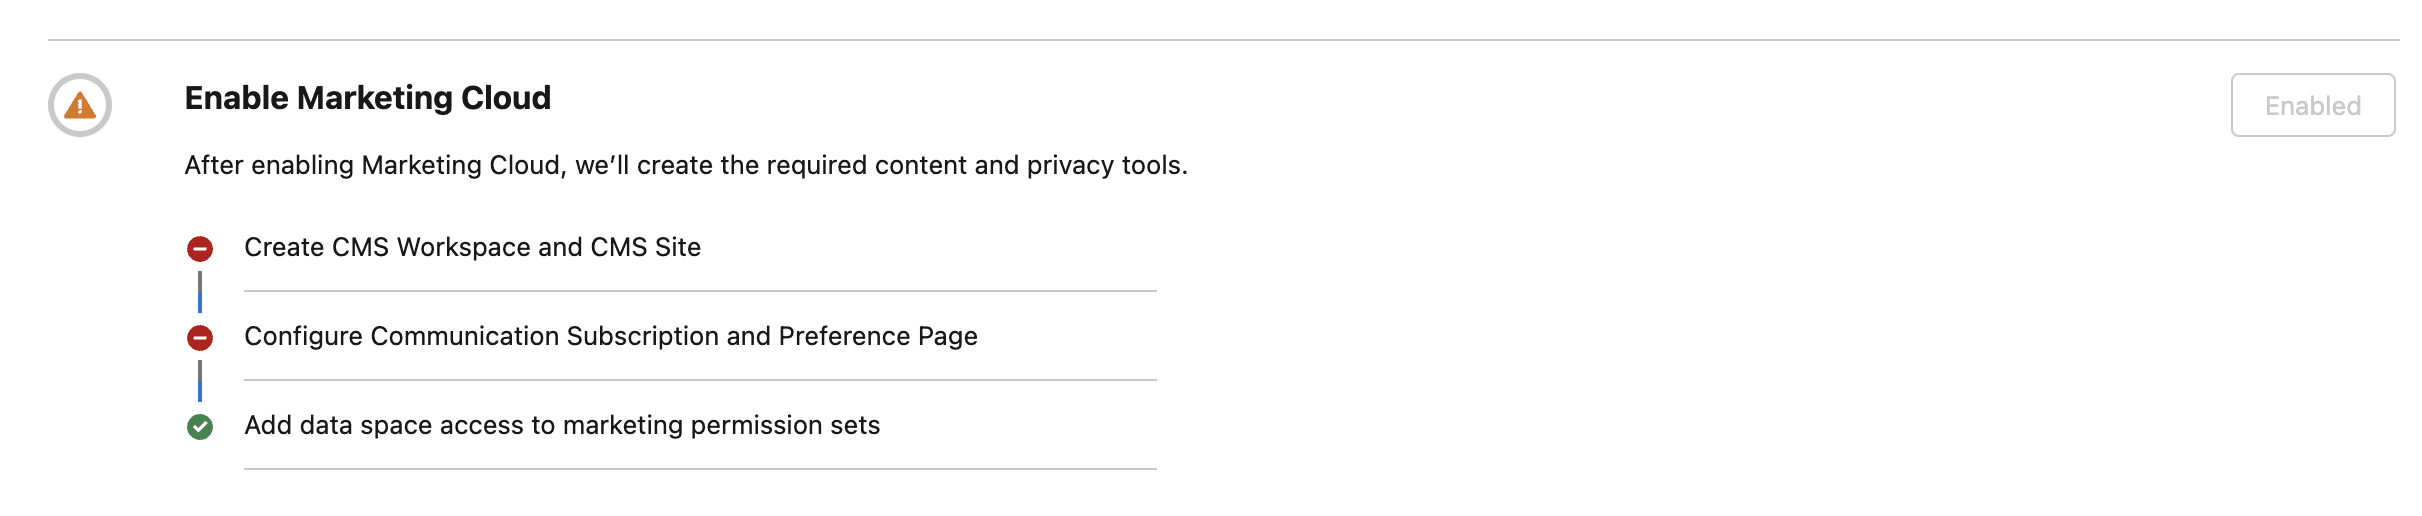
Your Permission Set are now… set.
Step #4. Defining a Company physical Address
A physical Address is needed to send promotional Emails in Marketing Cloud Growth and Advanced. Go to Setup and Search for Company, then click Edit.
Enter the details of your Company in the Fields Street, City, State, Zip/Poste Code and Country (All fields must have a value).
Save.
Step #5. Deploying the Data Kits
By deploying the Data Kits, we are installing Data Streams and their Connectors so the data flows from Marketing Cloud Growth/Advanced and the Salesforce Platform into Data Cloud (more on this later).
Go back to Basic Settings (you should know how to do that by now 😎), and click the Install button, which should now be available.
The Data Kits are being installed one after the other. Every time an installation is completed, you should receive an Email.
It can take some time to complete all the Data Kits.
You should see something like this by now:
Note: from time to time this process fails, for different types of reason, but we’ve always managed to fix it. So, if it is happening to you, comment this article, we’re here to help. Start by simply retrying.
Step #6. Create an Identity Resolution
By staying on the Basic Setting page, we are now going to setup the process of identifying identical person records and reconciling them. This is called Identity Resolution in Data Cloud and this process creates the Unified Individuals records which we will be using soon. Click Generate Ruleset in the last section
Then click Generate.
Note: the matching generated is very simple, two Individuals are considered identical as long as their Email Addresses are matching (when they have one in common to be precise). We won’t generate a Unified Account Rule Set in this quick setup.
Step #7. Create a Sender Domain
In the past, we could use the sender address [email protected], as it was an Organisation-Wide already verified address. But, Marketing Cloud Next (Growth/Advanced) now needs an Authenticated Domain. First we will need to trigger a migration to Authenticated Domains. Setup and search for Migration open it (under Unified Messaging Email)
Transfer. If you have running Campaigns, you are asked to stop/pause them before proceeding. Check I’m ready.
Transfer
You can now reload the Setup and search for Authenticated.
+Add Domain.
Enter a Sub-Domain of your main Domain and Submit (you can also use your root Domain)
We will then need to Create 8 DNS entries, so Marketing Cloud Next can send Emails using our Sending Domain. To display the new entries to create, click Manual DNS Record Information.
The way you create those Records depends on how your DNS is managed. Once the records are created and propagated (this may take some time depending on different factors, TTL, etc.), you can proceed to the activation of the Sending Domain.
Check I completed my changes with my DNS provider and Activate my Domain.
Check Notify me when complete and add your Email Address to be informed when the Domain is Activated. Finish. The status is now Pending.
Next, we will create a Sender Address, used to send our first Email. Click the From Addresses Tab.
+ Add From Addresses
Save. An email should be received when the Domain is activated and the Sender Address will then be usable.
Step #8. Creating a Default Data Graph.
A Data Graph is a set of data tied to a Unified Individual. It is used to personalize the Emails for example, or in Flow Decisions. We need a default one to send Emails, even though we wont personalize the first Email we’ll send. Go to Data Cloud > Data Graph > New
Select Start From Scratch. Next.
Next. Give the Data Graph a Name and select the Unified Individual DMO for Primary Data Model Object.
Next.
We could add other DMOs, but for this Quick Start we will just add the First Name and Last Name fields of the Unified Individual DMO. Save and Build
Let’s keep a daily refresh. Save and Build. Then we need to declare this Data Graph as the default one for Marketing Cloud Next (Growth/Advanced). Setup > Customer Engagement.
Select the Data Graph you created above, in the Configure Basic Personalization section.
Update.
And, that’s it. Our Marketing Cloud Next (Growth/Advanced) instance is ready to send emails. Of course, in this quick setup we have only configured the features we need to send an email, more on this in the Final Thoughts section.
We can now…
Use Marketing Cloud Next
Step #9. Creating a recipient
We are going to send an email to a new Lead, with an Email Address we have access to.
So go to Marketing Cloud by clicking the App Launcher (aka the waffle) and searching for Marketing, then selecting the purple icon, not the orange one (which is a legacy App you may remove).
Then select Leads > New (use the first record type) and create a new Lead, by specifying a known Email Address.
Before we leave this page, we are going to edit it to add the Privacy Consent Status component, so we can opt in this new email address to our default Marketing Subscription created during setup for us. Settings > Edit Page
Search for Privacy and drag the Privacy Consent Status in the canvas, in the Marketing Tab.
Save. Back to our Lead page, we click the arrow at the end of the line corresponding to our Email Address, and set the Consent Status to Opted In.
Save
Step #10. Let’s Synchronise Data Cloud
That Lead would eventually be created in the Lead_Home DSO and hence be created as an Individual, but we’ll speed up the process here. Go to Data Cloud (App Launcher and search for it), in the menu select Data Stream, then access the All Data Streams list view and search for Lead. Then, using the arrow at the end of the line, select Refresh and then open the Data Stream.
When the Last Run Status changes from Pending to Success (and we should have 1 Last Processed Record: our new Lead).
Step #11. Running the Identity Resolution
In the setup process, we created in an earlier step an Identity Resolution Ruleset, but we did not schedule it. So we’ll run it now. Go to the Identity Resolution in the Data Cloud menu, select the Individual Identity Resolution record and then click Run Ruleset.
After some time, Last Run Status changes from empty to Succeeded.
Step #12. Update the Data Graph
As we just created our Unified Individuals, we need to run the Data Graph, to be built a Data Graph for each of them. Data Cloud > Default Data Graph > Refresh Now.
After some time, the Data Graph is updated.
Step #13. Create a Segment
In Marketing Cloud Next, Emails Campaigns are sent to Segments, made of Unified Individual. Let’s create a Segment in Data Cloud with just our new Lead. Go to the Segment Menu item in Data Cloud and click New. Leave the selected choices as-is an then click Next.
Then select Unified Individual for Segment On and a name for the Segment.
Next. We’ll keep the default Standard Publish for the Publish Type and Run Mode to Do Not Schedule.
Save. Great, we are now in Segment Builder, exposing Data Cloud DMOs.
Done. We’ll now Publish the Segment, so we can use it. Click Publish.
Don’t worry about the warning, we will use the Segment soon. We wait some time for the Segment to be published: Publish Status changes from nothing to Success.
Step #14. Creating a Campaign
Get back to Marketing Cloud by using the App Launcher (purple icon), and select Campaign in the Menu. Click New. Use the first Record Type, Next. Give your Campaign a name:
Save.
Step #15. Creating the Flow and Email
Marketing Cloud Next (Growth and Advanced) uses Flows for almost every action/automation. There are good starting points already created. Using those templates, we create complete starting points.
Click Select to create a Single Email Flow.
Note: we have not activated Agentforce in this Quickstart, but if we had, you could also create a Campaign, its Flow and Asset out of a single prompt.
For this Flow, we will need to configure some elements. Click Open Flow.
Click +Set Schedule. Keep Run Once and select Start Immediately after Activation
Close the right panel using the cross button (or Save). Click on Segment Triggered Flow (first element) and then click Select Segment. For the Segment, we select the Segment we create earlier.
Next, we click on the Send Email Message element (the second one).
Next to the Email name, we use the dropdown and click Edit.
We are directed to the Email Builder. We won’t make any changes, but this where you could choose your Brand for styling, add or remove parts, personalise the copy using Merge Fields (for this you will need a Data Graph to expose Data Cloud to the Builder), etc. Click Publish.
Then Next and Publish Now. Our Email is now published, let’s go back to the Flow. We will select the From Address, using the Adress of the Sending Domain we declared earlier. If not Available, the Domain has not been activated yet (activation email not received yet), and you’ll need to wait for this.
We’ll now select the Subscription to use in the Marketing Email (the one we declared our Lead opted in: Marketing, created for us during the setup).
Save the Flow. If the previous editing steps of the Flow were correct, Schedule, Segment, Publishing the Email, defining a Sender and a Subscription, then there should be no more error on the left sidebar.
Step #16. Sending the Email
You’re all set 😎. Activate, and your first Email will be sent.
You should receive quickly an Email in your inbox 🎉.
Final thoughts
From there, there are a lot of things you can do, like:
- Enhancing the Data Graph for personalization
- Changing default images
- Activating Marketing Performance
- Adding Data Cloud Components in Lead and Contacts
- Preparing SMS and WhatsApp channels
- Adding Predictive AI (Einstein)
- Activating Agentforce
- Testing Designer Beta
- Creating your first Landing Pages and Form
- Configuring Internal and External Tracking
- Experiment Flows, Repeaters
- Try a etter Identity resolution
- Using RMM
- Understanding Consent Management
- …
A lot to come.