Sending Emails is a common task for Marketing Teams. In Marketing Cloud Next, you can react to Email Engagements (Clicks, Open, etc) inside the sending Segment Triggered Flow, or by using another Flow type: Blank Event.
Handling a reaction from a Segment Triggered Flow
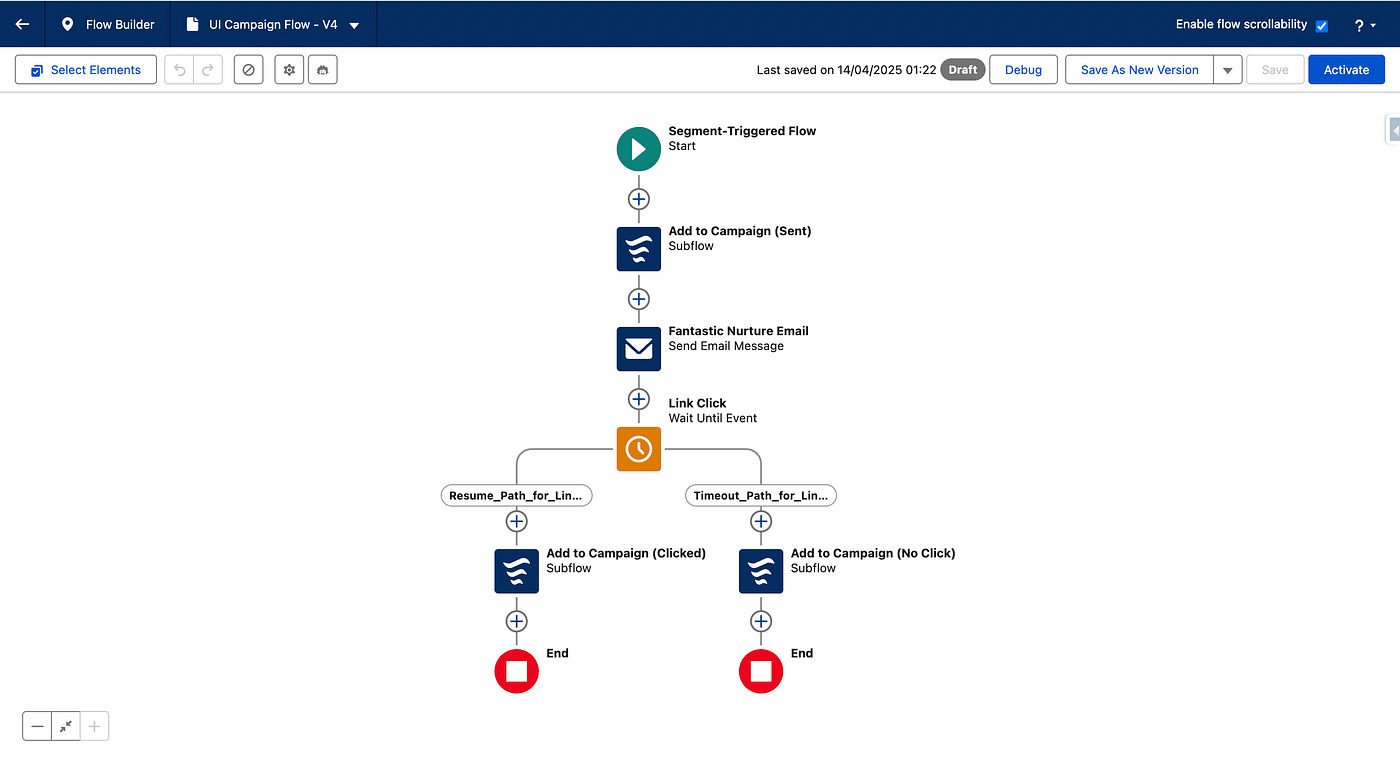
In our previous article, we created a Sub Flow to add (or update) a Unified Individual to a Campaign (by adding all its underlying Individual to it).
We called that Flow to add the Segment Members into a Campaign (Sent Status) just before Sending an Email, and added a Wait for Event Activity (set to wait for clicks). Depending on the issue of this activity, we then updated the Campaign Status to Clicked or No Click (timeout).
Handling a reaction from a Blank Event type Flow
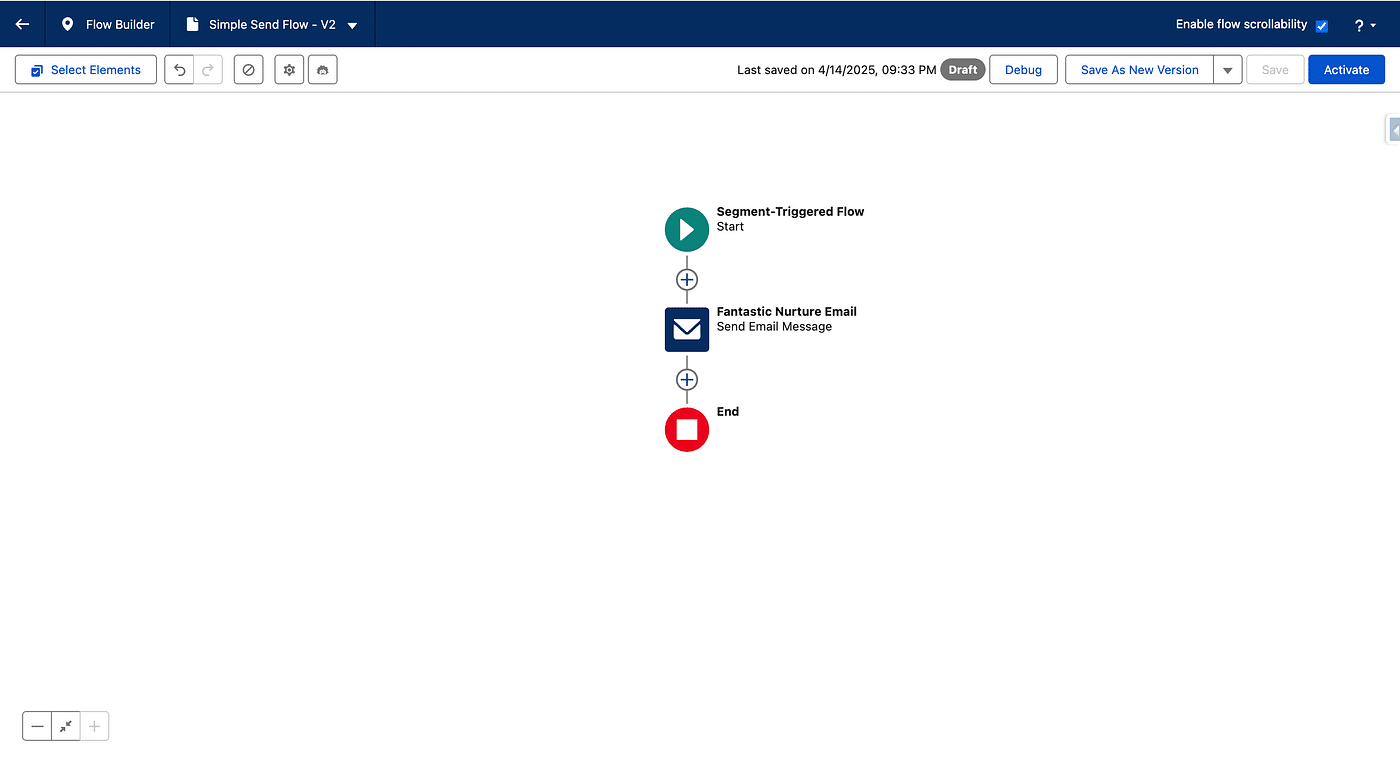
Let’s say we used a Segment Triggered Flow to send an Email. Our Flow is very simple, just sending the Email to the Segment Members (Unified Individuals). Overview of 5 Flow templates
Creating a Blank Event Flow
From the Campaign, we will create a new Flow by clicking Select on the Blank Event card.
Once created, we click Open Flow (or Configure the Event), then Select Event.
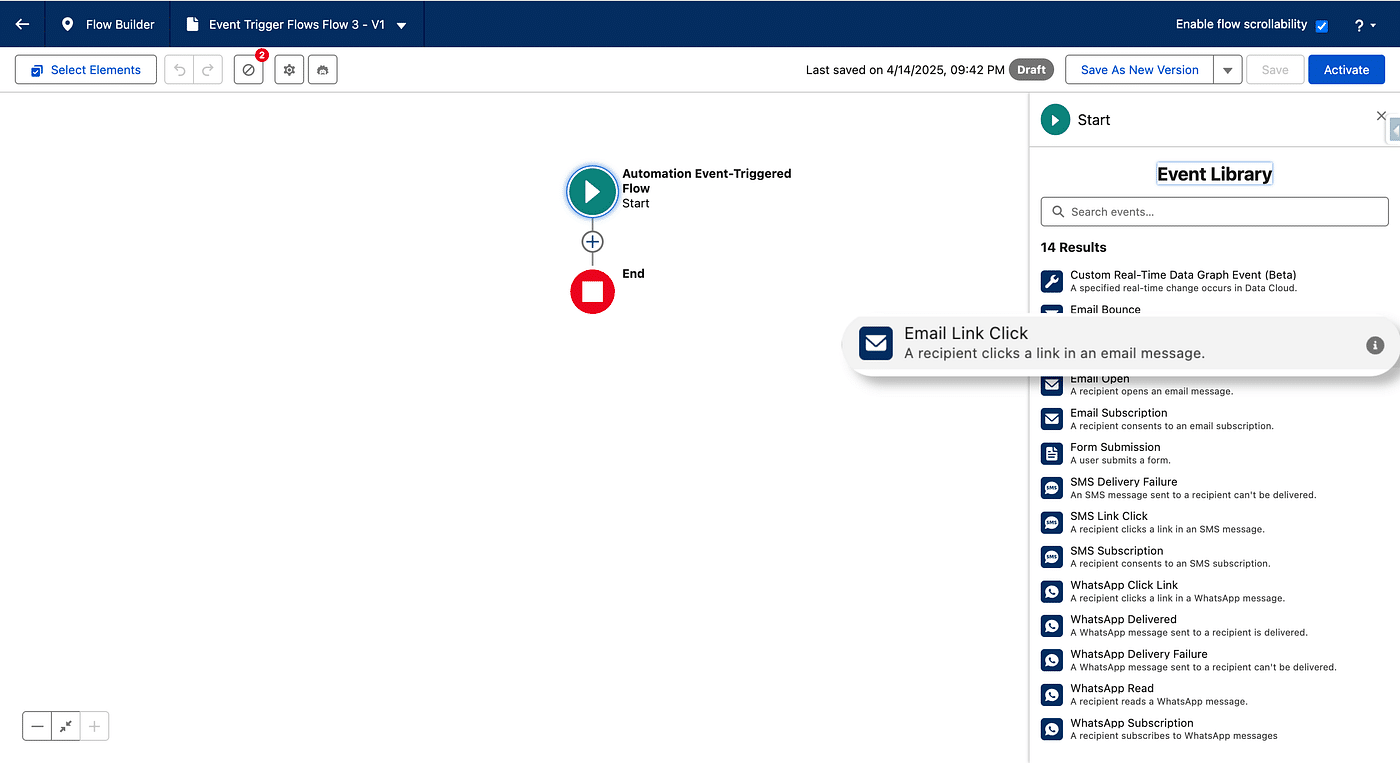
In the list we will select the Email Link Click trigger. Notice, the different types of triggers, which make Blank Event Flows a very handy tool to react all kind of user interactions and date-driven events.
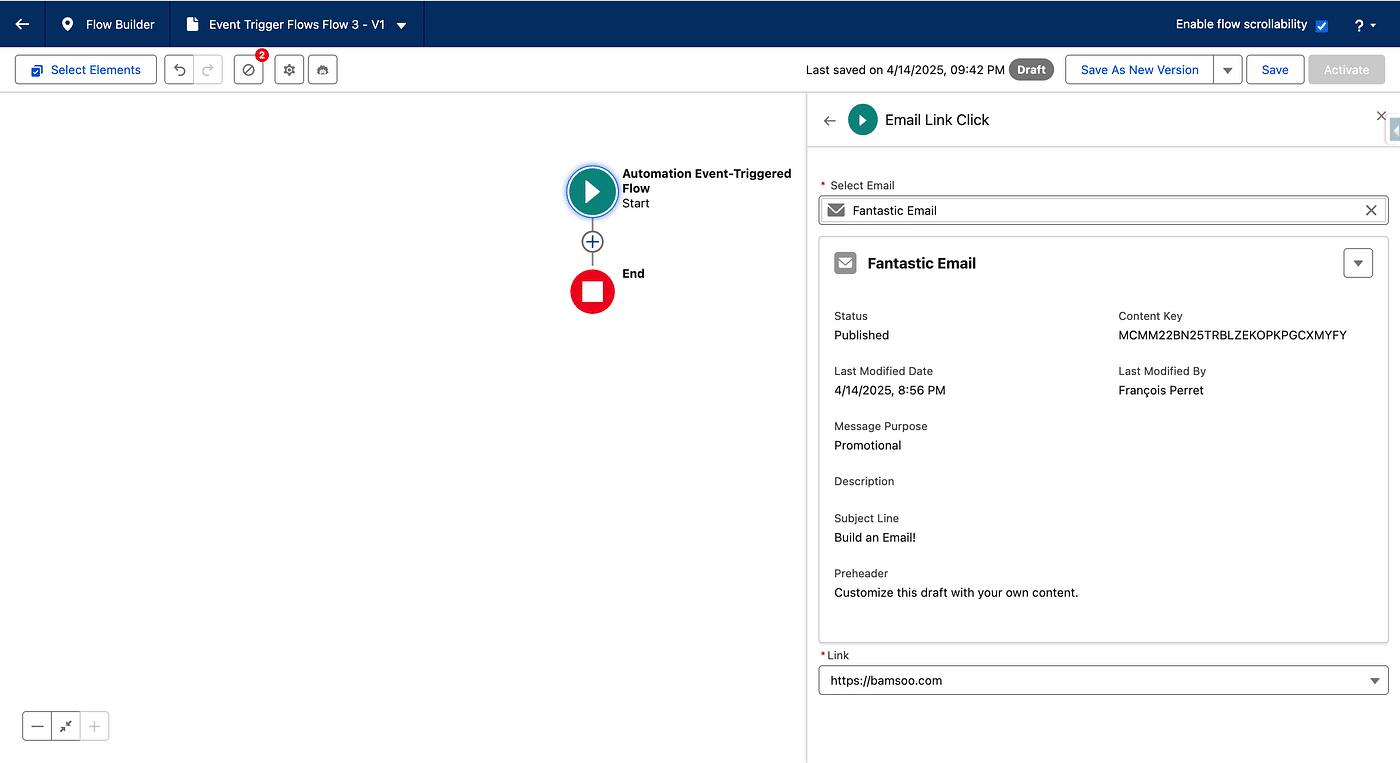
Then we select the Email we sent in the previous step and if we want all clicks to trigger the Flow, or only clicks on specific links.
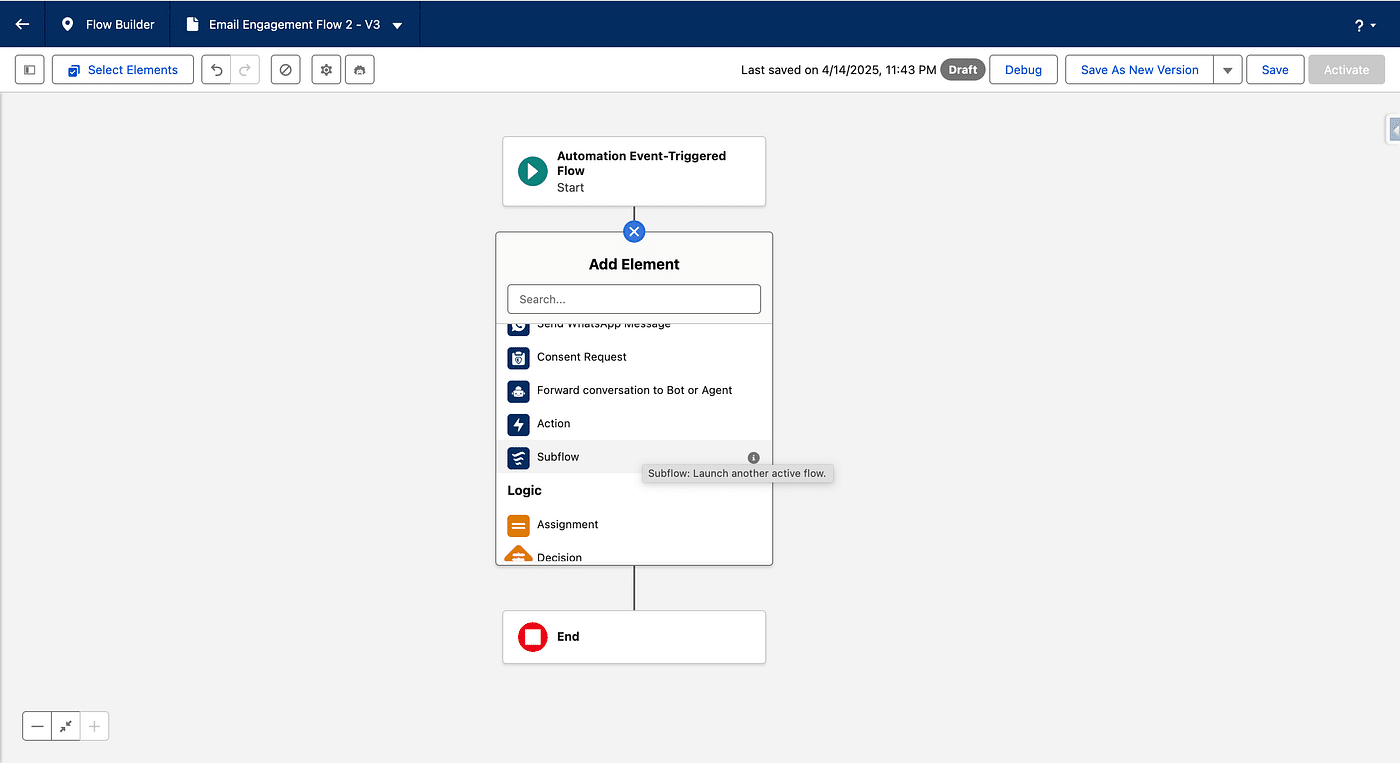
Next, we want to react to the click by adding the recepient to a Campaign. As we may reuse this action (to handle Open for example), we create a reusable Flow, called a Sub Flow.
Add Individual to Campaign Sub Flow
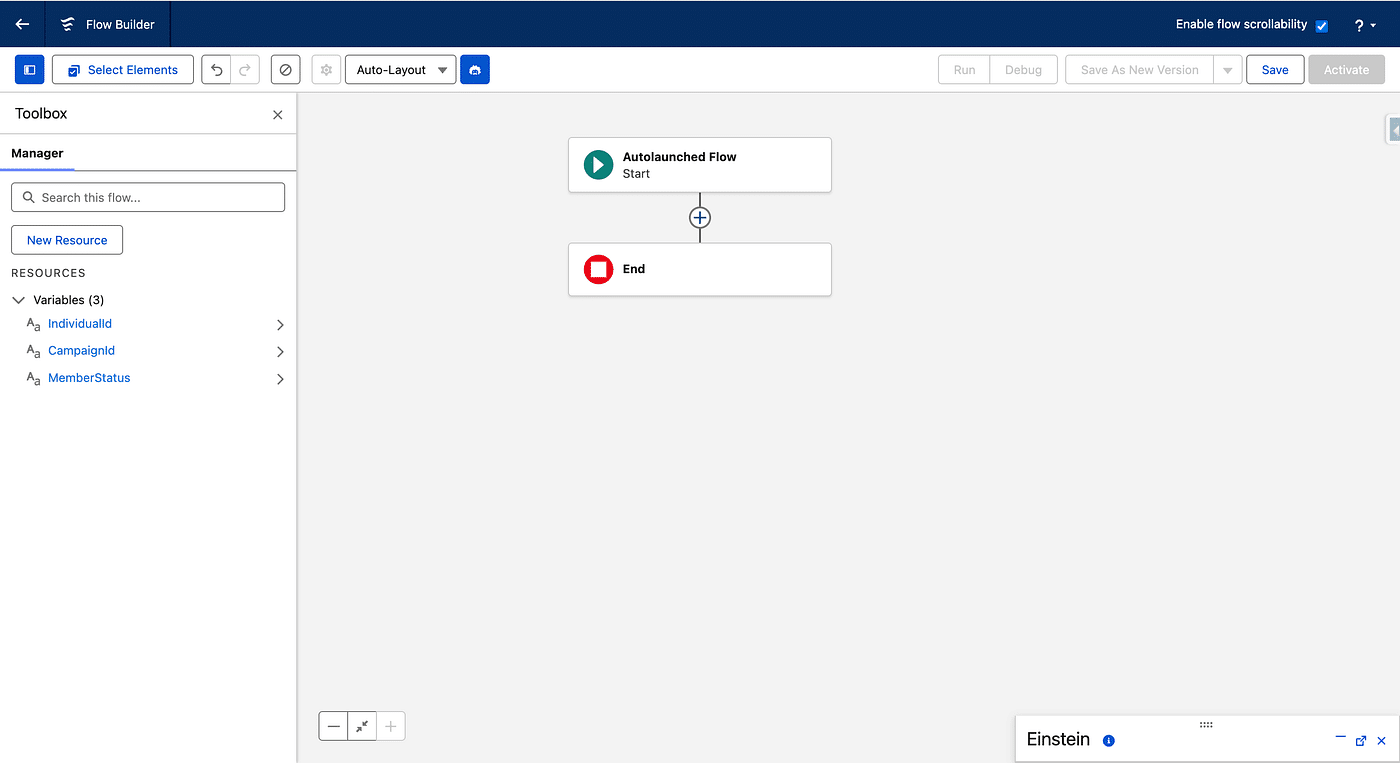
Let’s create an autolaunched Flow. Setup > Flows > New Flow > Autolaunched > Autolaunched Flow (No Trigger).
We’ll pass the individual Id as a input parameter. In the left Panel, click New Resource, select a Text Variable, name it Individual Id, and check Available for input.
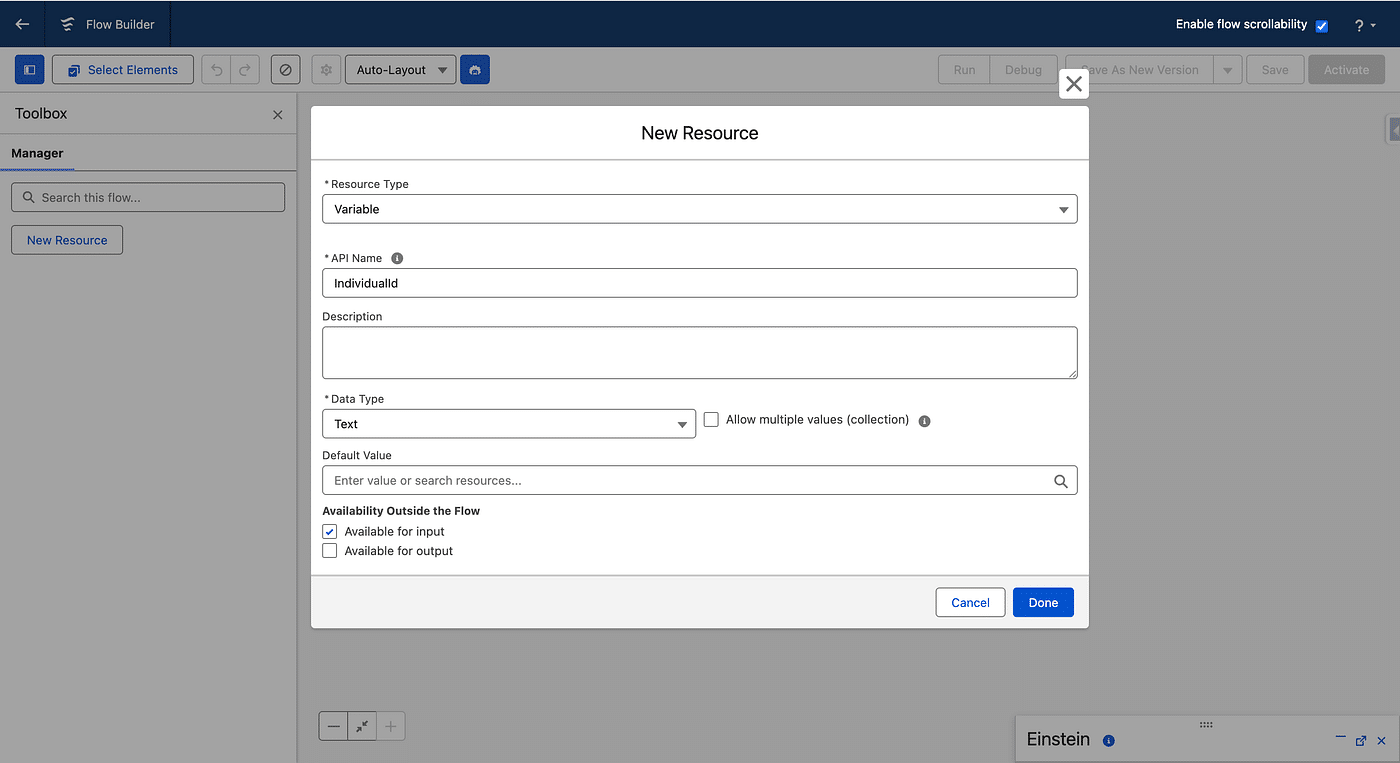
We them do the exact same thing for 2 other Fields, CampaignId and MemberStatus.
If a Campaign Member already exists, we just need to update it, if not, we need to create it, so we need to check if the input Individual Id is a Campaign Member of the input Campaign Id.
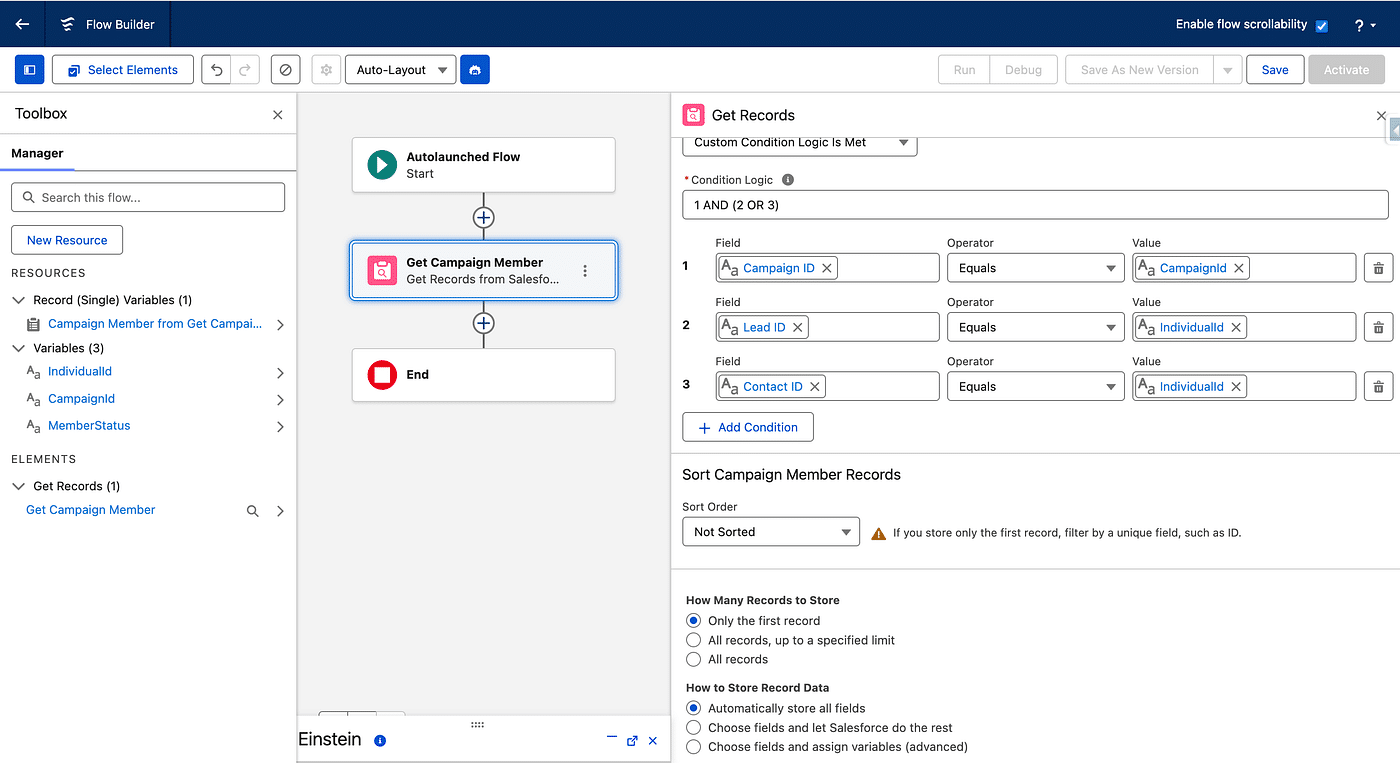
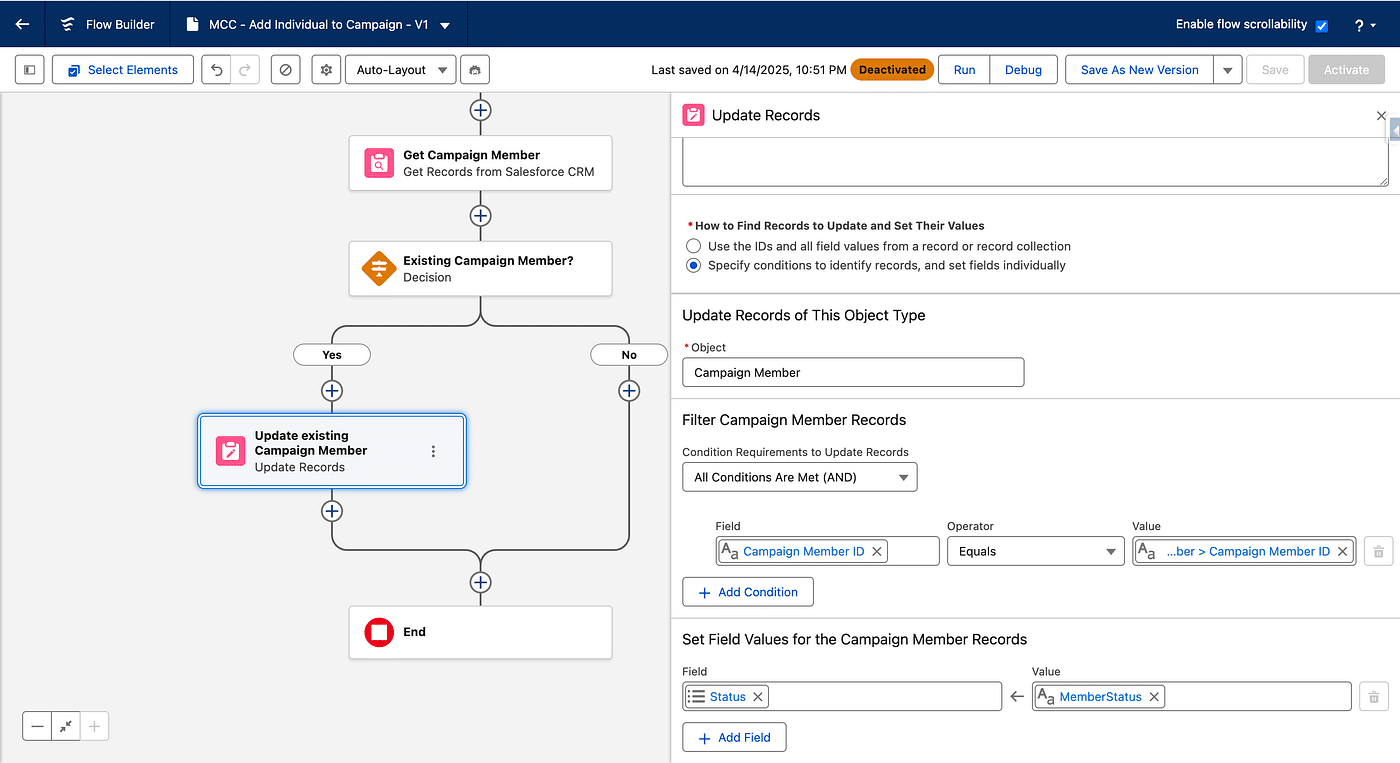
Let’s add a Get Record to the Flow. We call it Get Campaign Member, choose Campaign Member as a Salesforce Object. See the following screenshot on how to set the Filter Conditions (we use a Custom Conditional Logic). We keep only the First Record (there is at most one) and let Salesforce store all Fields.
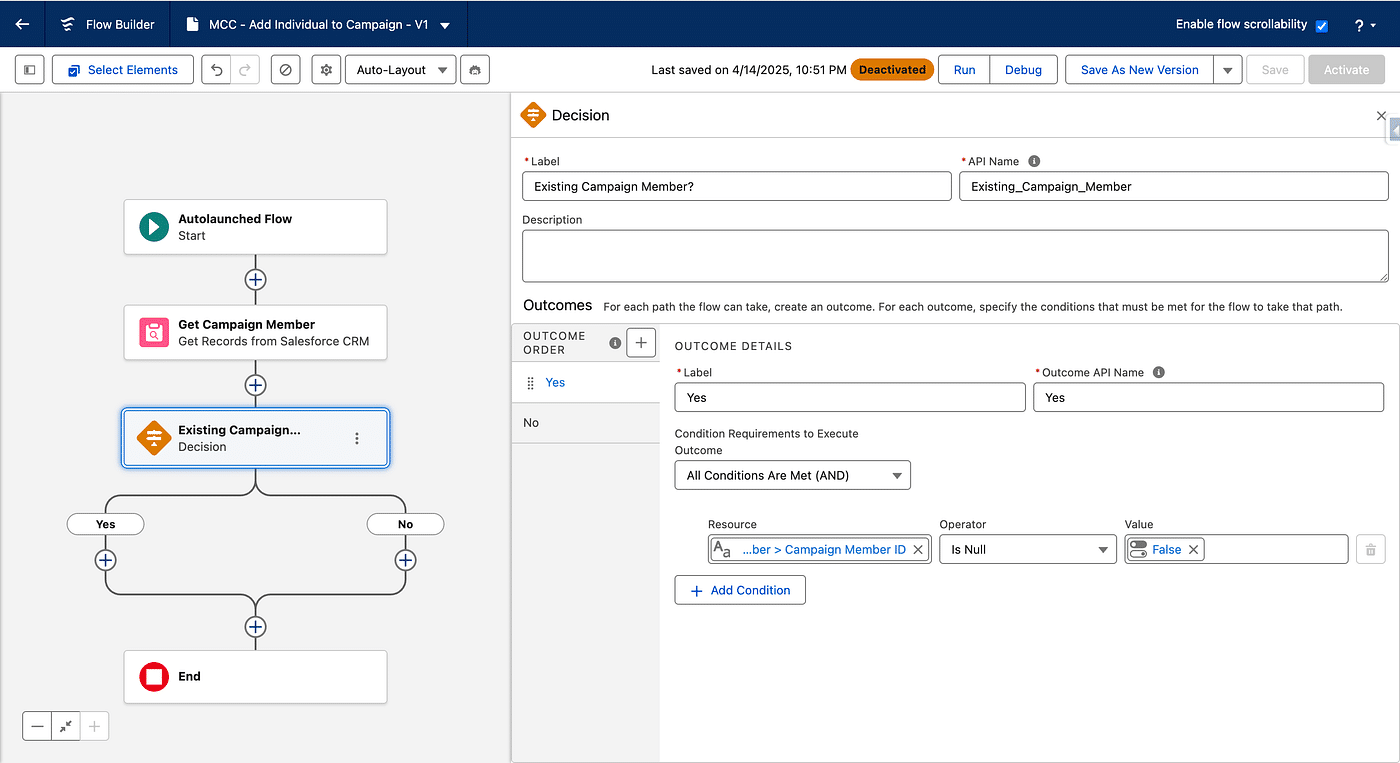
If we found a Campaign Member, we will just update the existing one, otherwise, we will create a new one. To check this, we add a Decision element after the Get Campaign Member element in the Flow. We call it “Existing Campaign Member?”, use Yes as the New Outcome Label. As a Resource, we choose Campaign Member Id from the previous step, it must not be null for the Yes path. Rename the Default Outcome “No”.
In the Yes path, we will add an Update Element, we call it Update existing Campaign Member and select “Specify conditions to identify records, and set fields individually”. The Object is Campaign Member, and the Record to be updated has the Campaign Member Id of the record found in Get Campaign Member (which is not null in the Decision path). The Status is set to the input Variable Member Status.
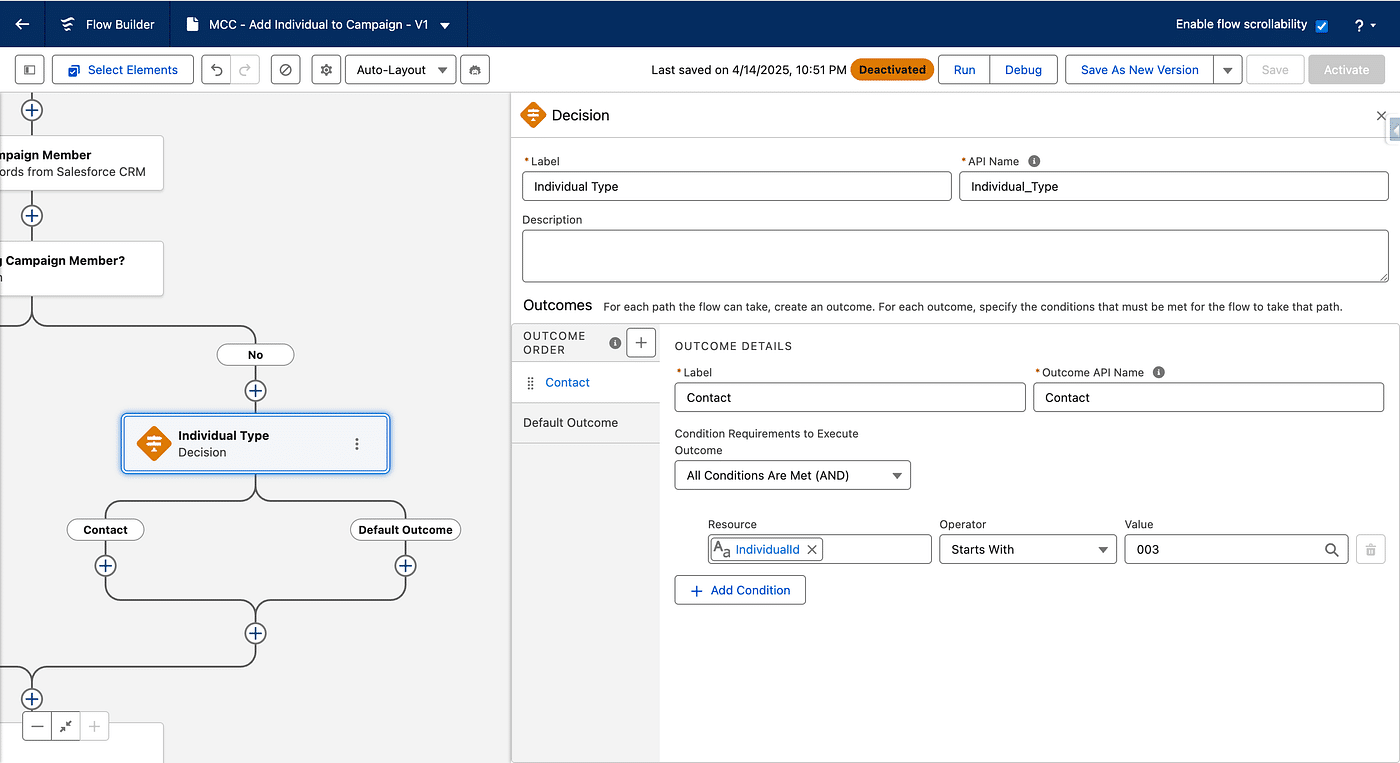
in the No path, we will create a Campaign Member. Before we do this, we will add another Decision to separate Leads from Contacts since the creation step does not involve the same fields. Let’s add a Decision activity in the No path and call it Individual Type.
We rename the New Outcome path “Contact” and add the Condition that our Individual Id input Variable must start by 003 (which is only true for Contact Records Id).
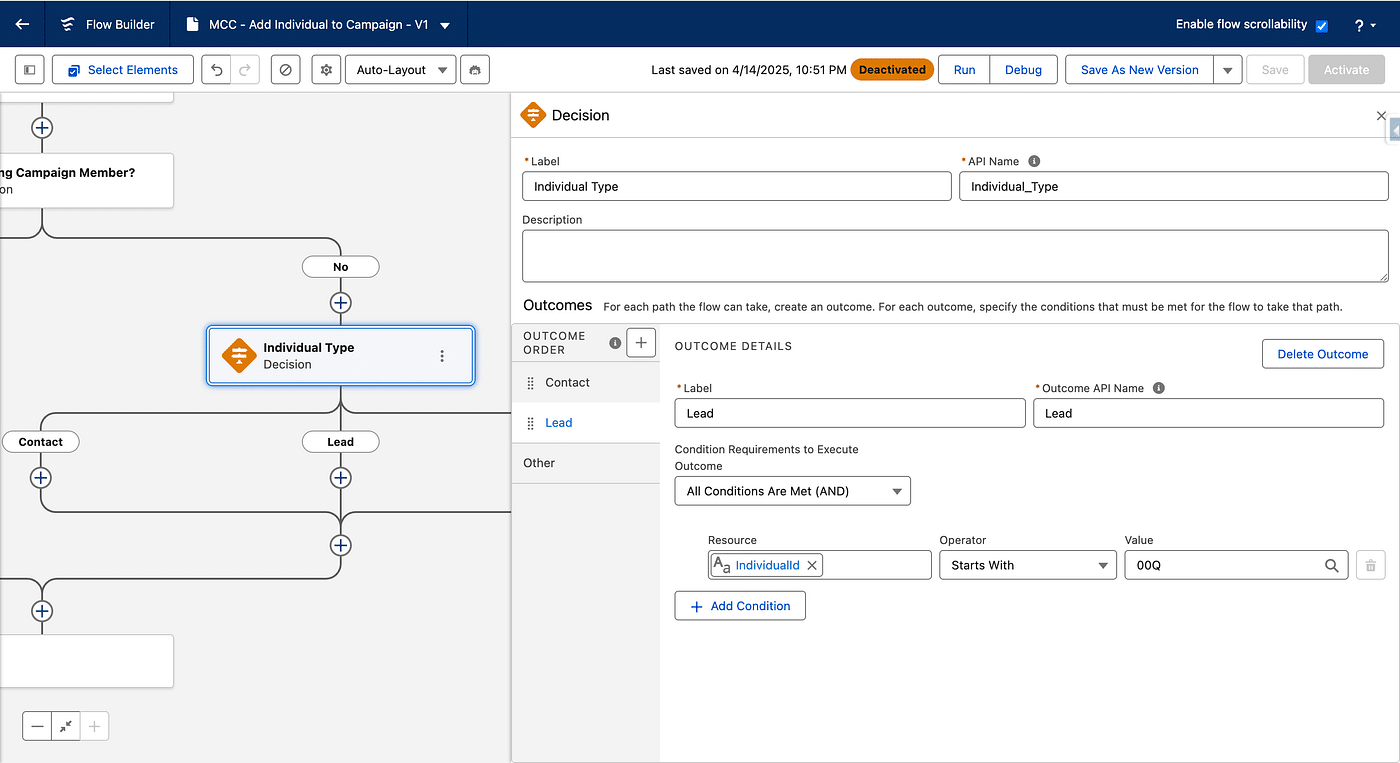
Next we add another outcome, called Lead, and this time the Individual Id needs to start wit “00Q” (which is true for Lead Records Id). We also rename the default outcome Other (if our Individual Id is not a Lead or Contact, like a Prospect or an External Id, we don’t create a Campaign Member, so we add an End activity there).
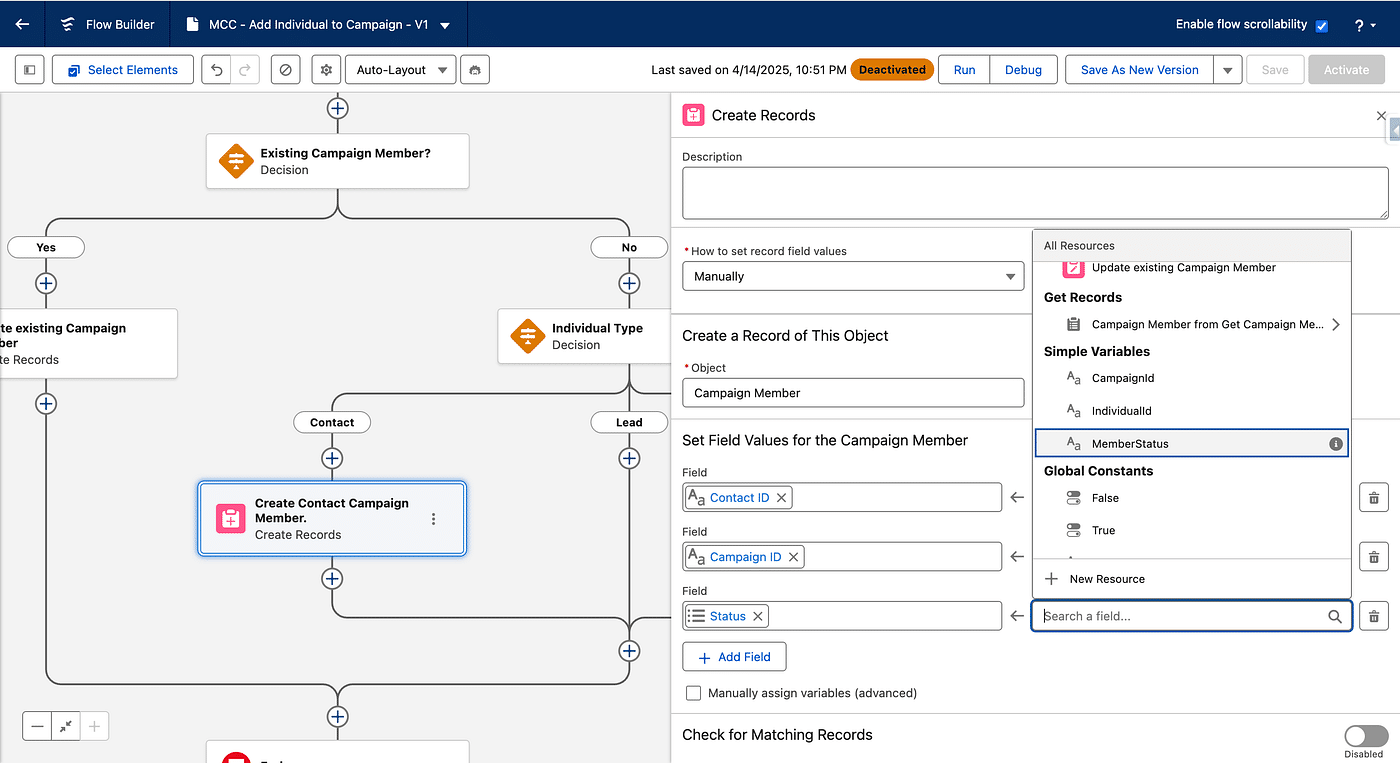
In the Contact path, we will add a Create Record activity, called Create Contact Campaign Member. For “How to set record field values”, we select Manually and use Campaign Member as a Salesforce record to create. In the Field Values we will use our input Variables value, Contact Id is IndividualId, Campaign Id is CampaignId and Status is MemberStatus. Leave “Check for Matching Records” unchecked.
We do the same thing for the Lead path, and this time we set Lead Id instead of Contact Id (to our input Variable IndividualId as well).
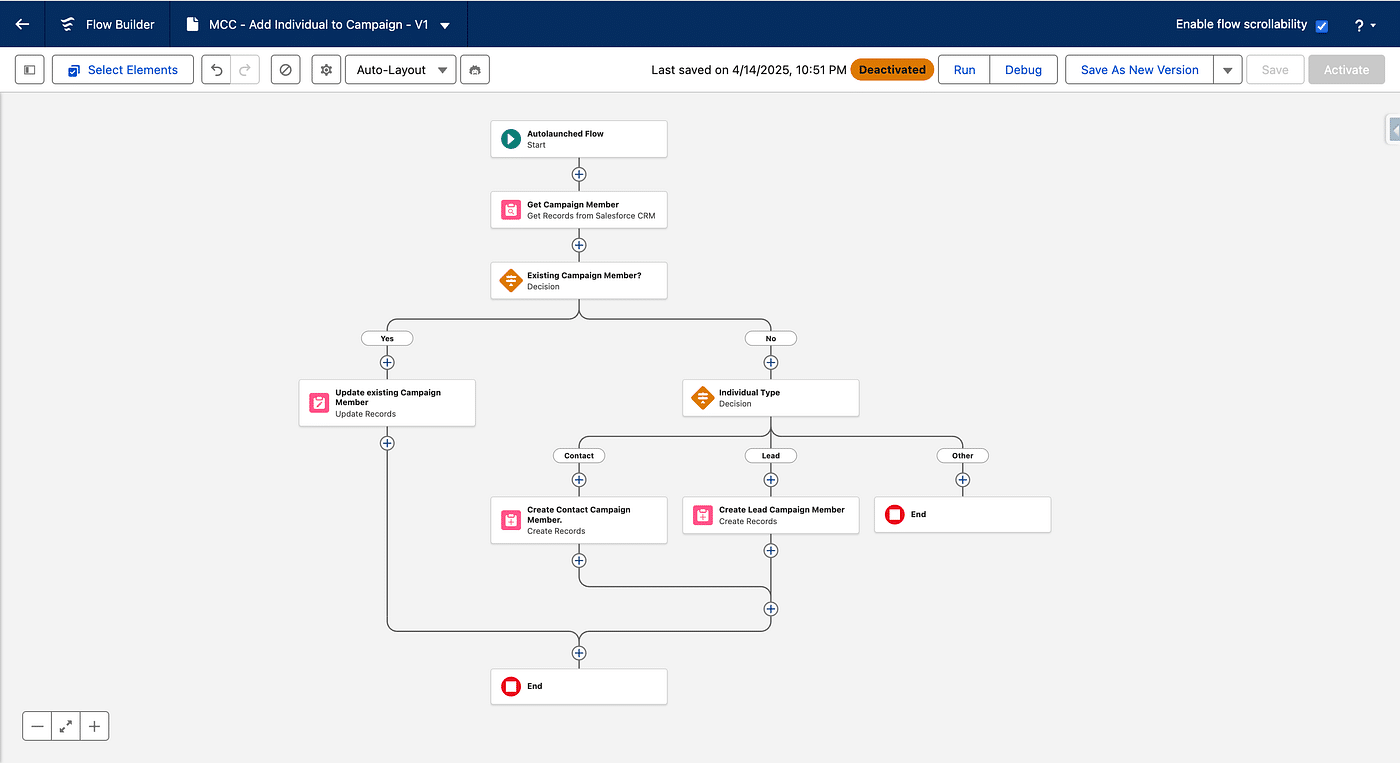
Our Sub Flow is ready 😎. We save it, with a name like “MCC — Add Individual to Campaign” (a prefix is handy for identifying easily your Sub Flows collection) and Activate it.
It is a reusable Component. It can handle many situations and creates or updates Campaign Member. Now it just needs to be called from our initial Flow, triggered by link Clicks
Adding a Campaign in the Blank Event Flow
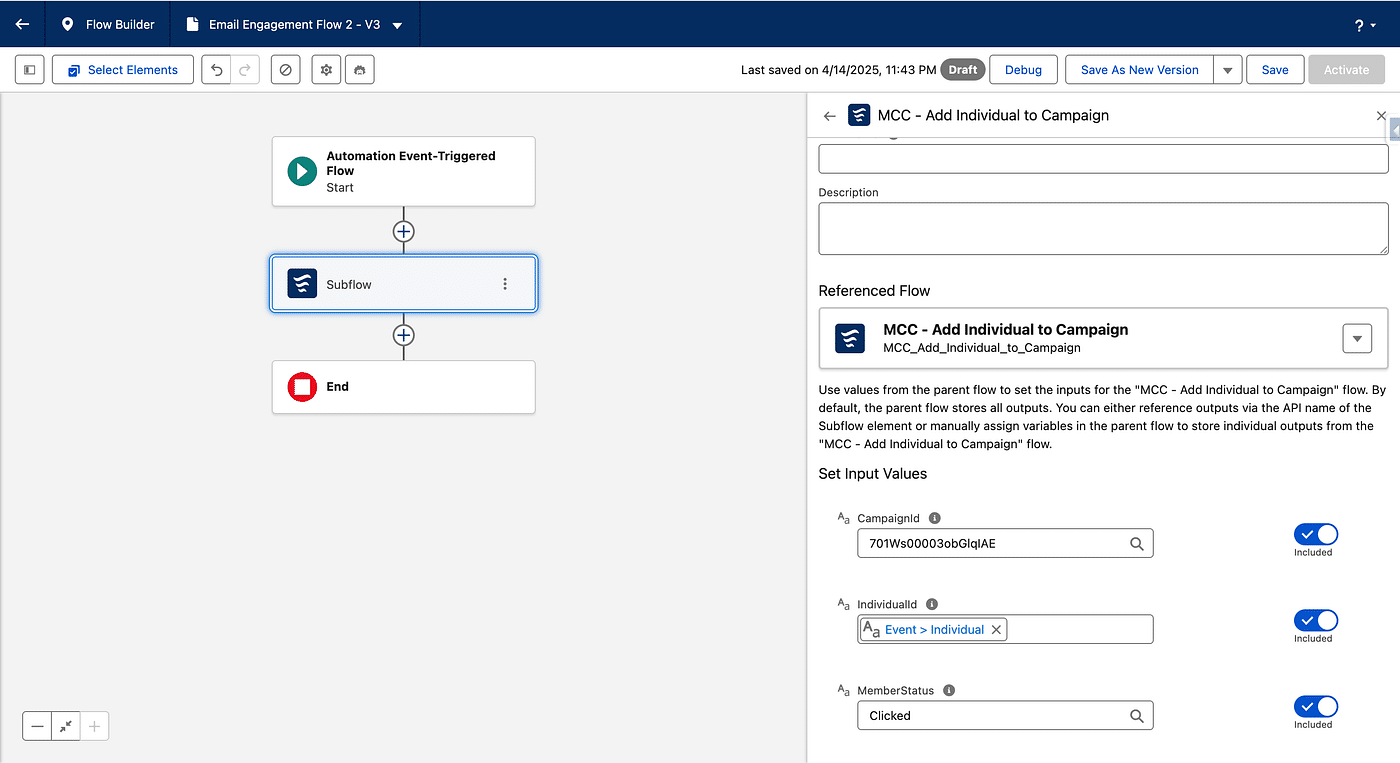
Our first Flow is be triggered when a Click happens in the related Email. We just need add an new element in our Flow. Add a Sub Flow activity.
Select “MCC — Add Individual to Campaign” and activate the three Input Values. CampaignID will be set the Id of the Campaign you want to add (starts with 701, found in the URL when displaying a Campaign). Member Status is set to whatever existing Member Status for this Campaign, we’ll use Clicked here.
The Flow provides a Global Resource called Event, which is in fact a Record (with fewer fields) of the Email Engagement DMO. Among other fields, there is the Individual (Prospect Id, Lead Id, Contact Id or some external Id). We will use this information to set the IndividualId that the Sub Flow expects.
Save and Activate your Blank Event Flow.
Now whenever you send the Email (from a Send Triggered Flow) and the recipient Clicks a given Link, that recipient is added/updated in the Campaign you specify with the Member Status you decide.
Final thoughts
It is now very easy to create another Blank Event Flow to handle Email opens and reuse our Sub Flow with the same Campaign, but another Member Status.
In the click handlingFlow, we may choose to be triggered on every link, instead of a specific one, which you can then use in a Decision element to add to a Campaign with a Status depending on the actual link clicked (use “Resolve URL” in the Event Global Resource). Handle a NPS or CSat survey from within an Email that way.
As a further enhancement, you may only update Campaign Member Statuses depending on the lifecycle. For instance, if a recipient clicked a link and later on reopen the Email, you may keep the Clicked status.